How to installFontana Texas Commercial Deck Mount Chrome Finish Automatic Sensor Faucet | FS10142
Easy step by steps installation instrctions for Commercial Automatic Sensor Faucet
Visit Product Page
Before you begin, please read the installation instructions below. Observe all local building and safety codes.
Unpack and inspect the products for any shipping damages. If you find damages, do not install.
Please note all products must be installed by a professional and certified plumber otherwise warranty might be voided.
sensor
Sensor Faucet Installations Instructions
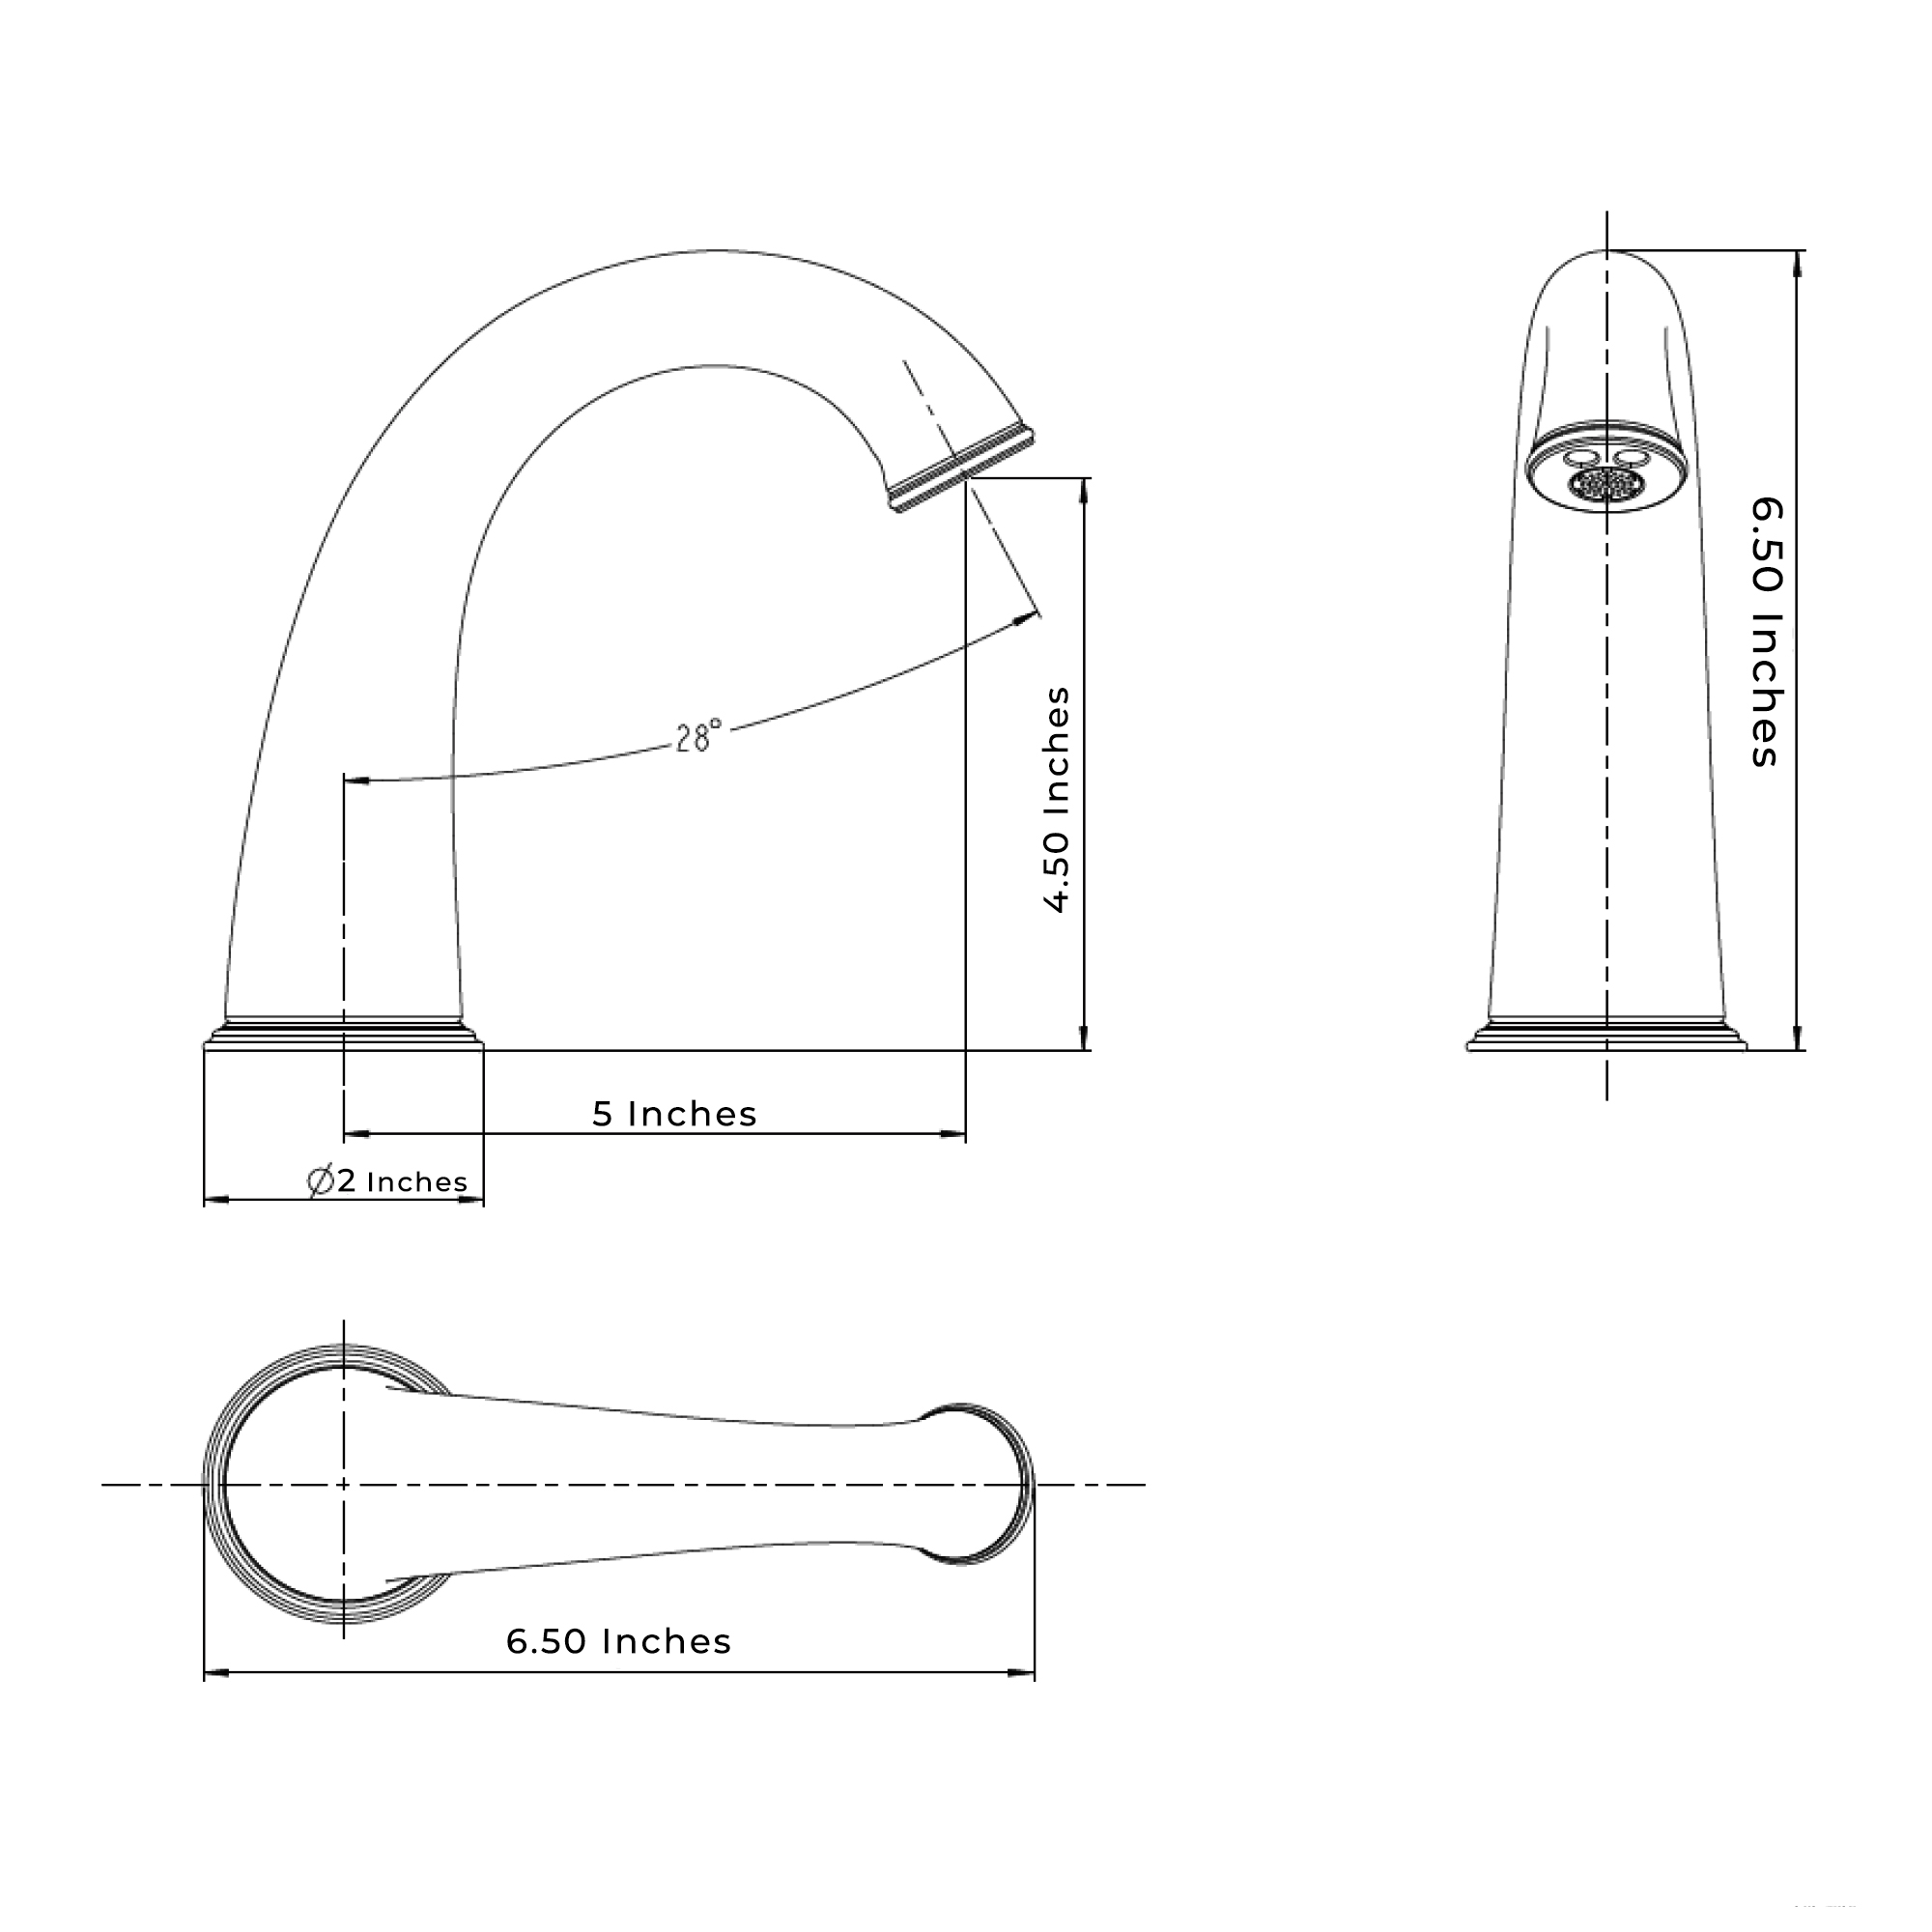
Size:
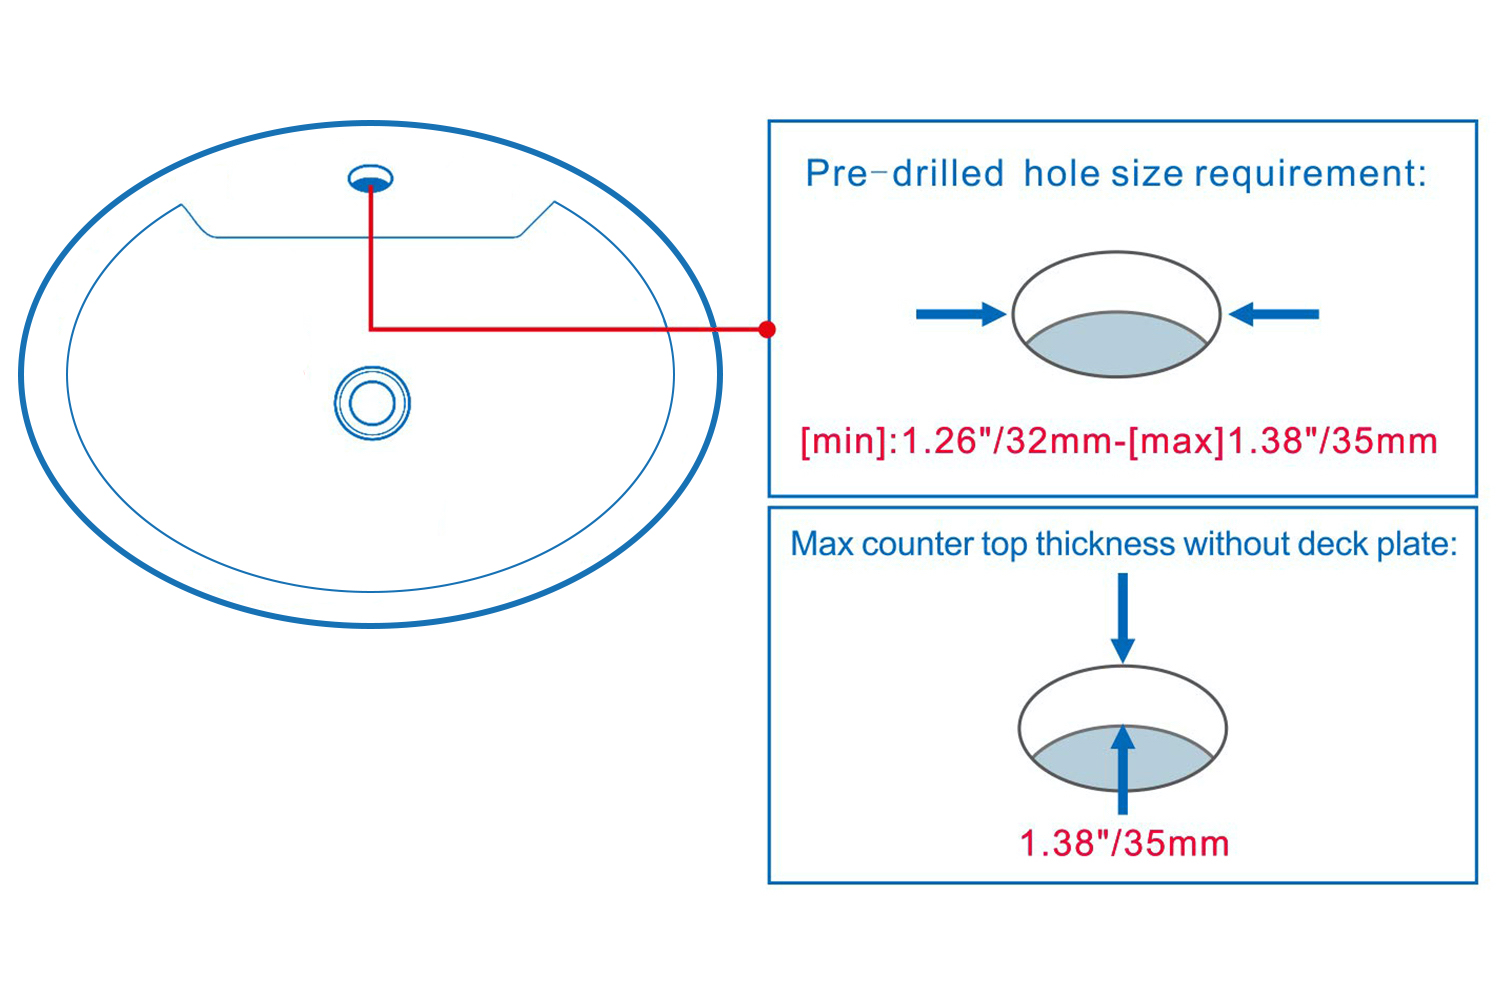
Hole Size Chart
Deck Mount Installation
Step 1:
Step 2: (Hot & Cold Connection)
sensor
Step 3:
Step 4:
Step 5: Flush Debris from waterpipes
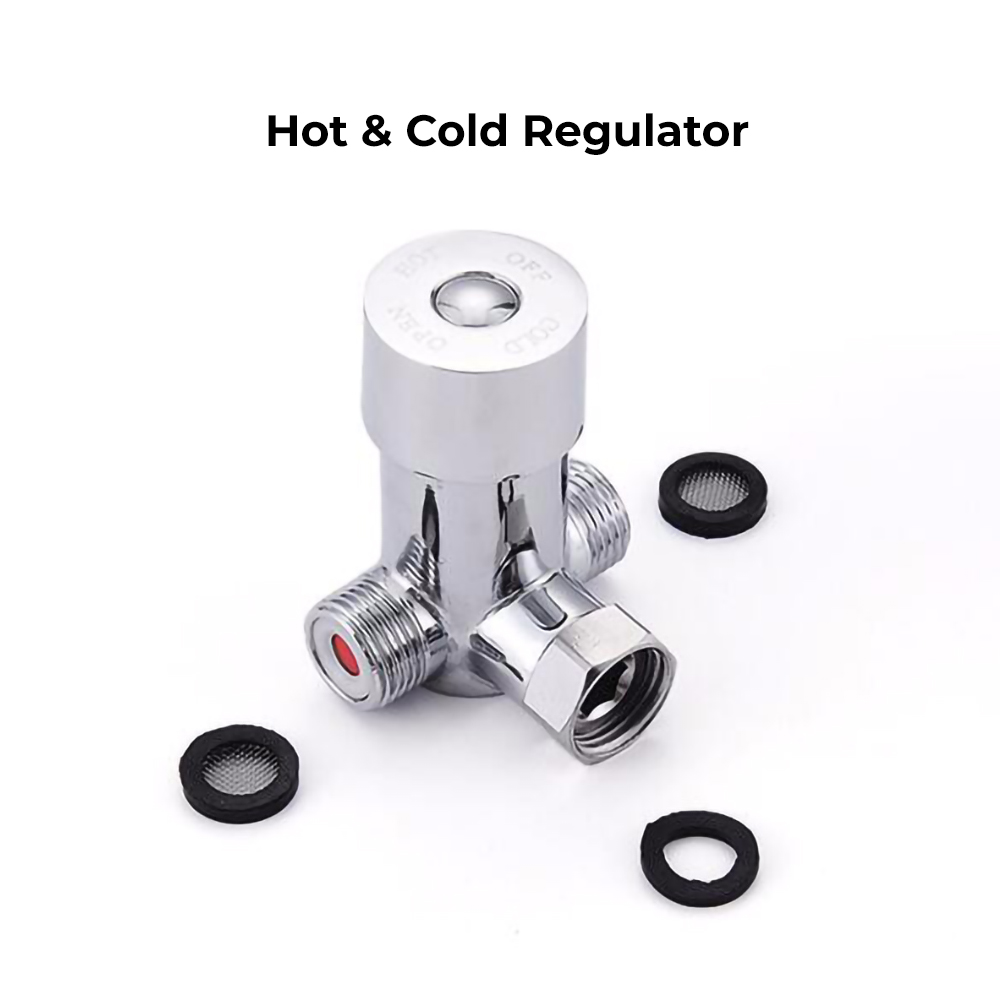
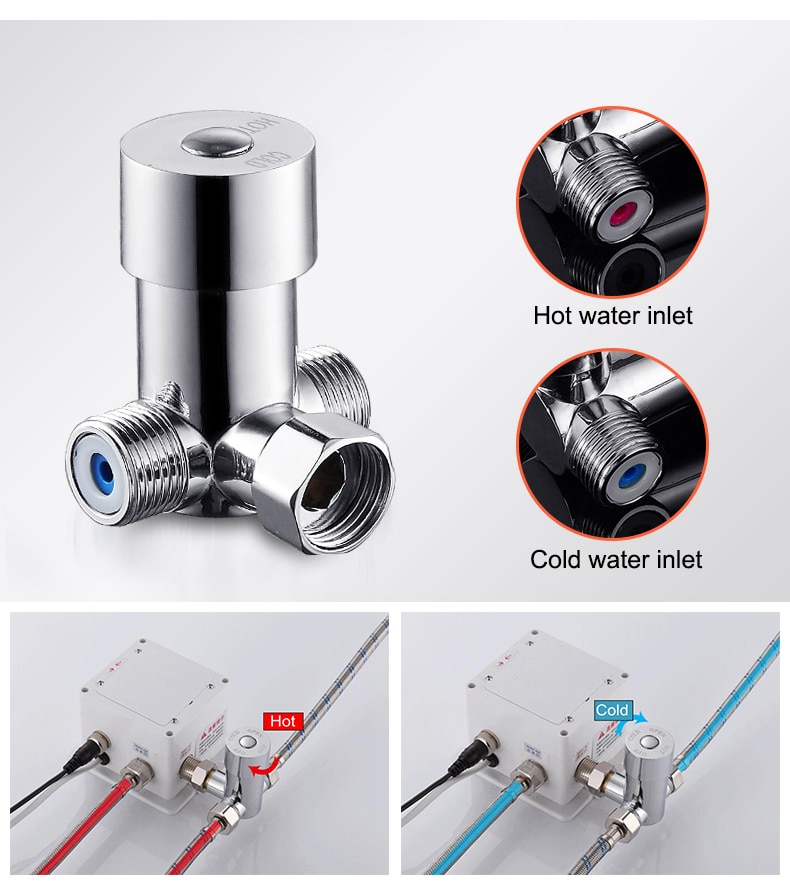
Step 6: Hot & Cold Regulator
Step 7:
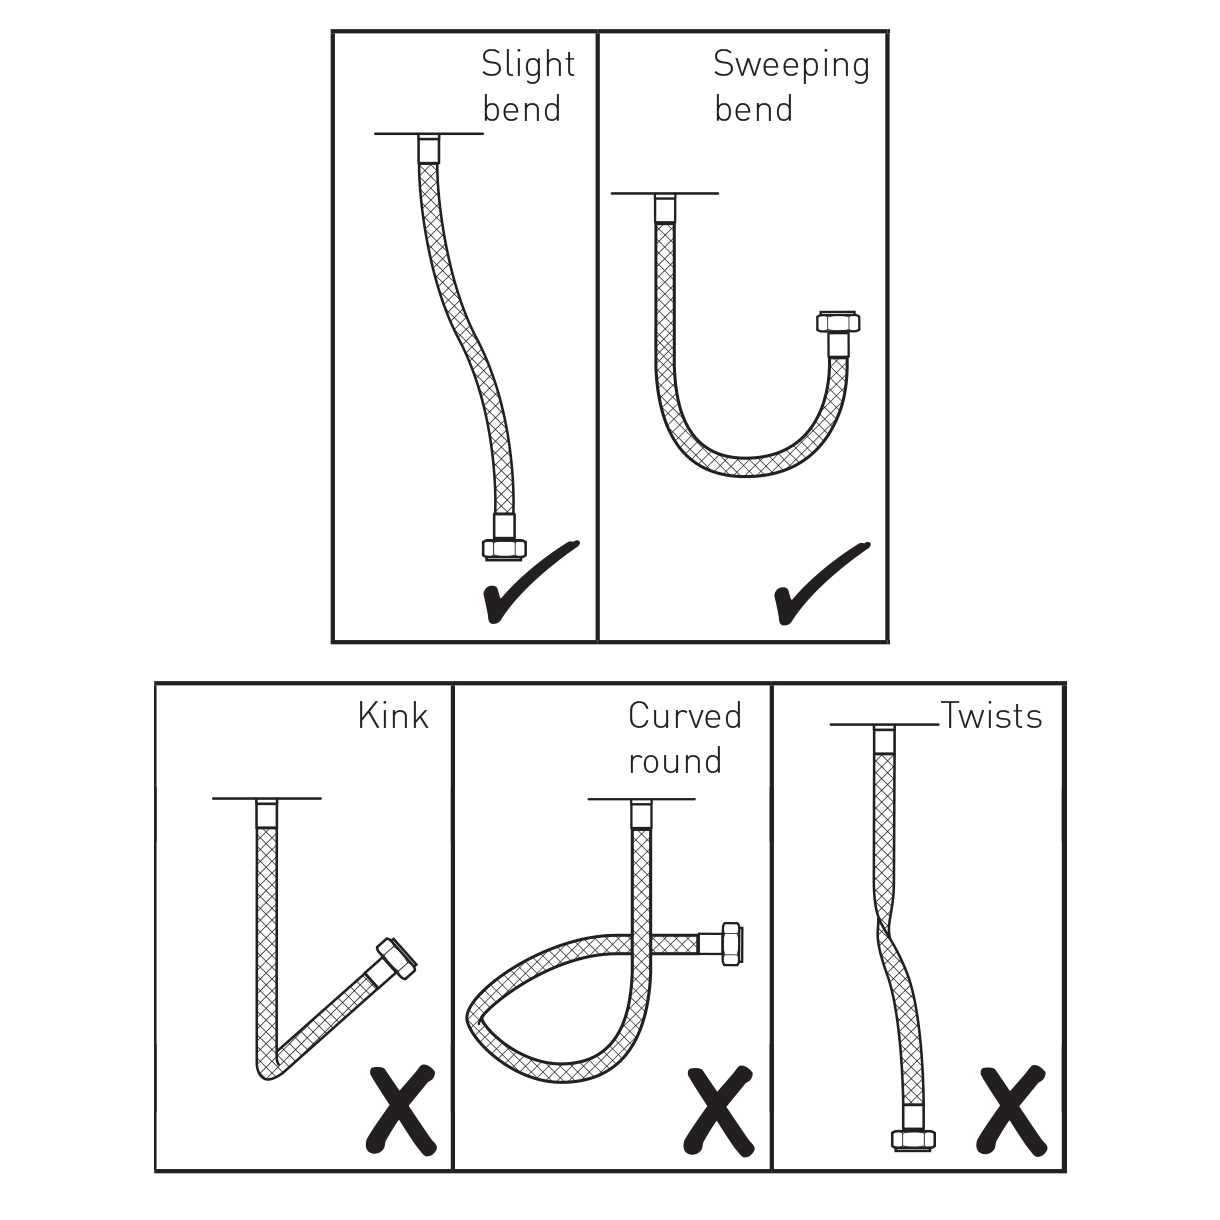
Step 8: (Correct way for Hose)
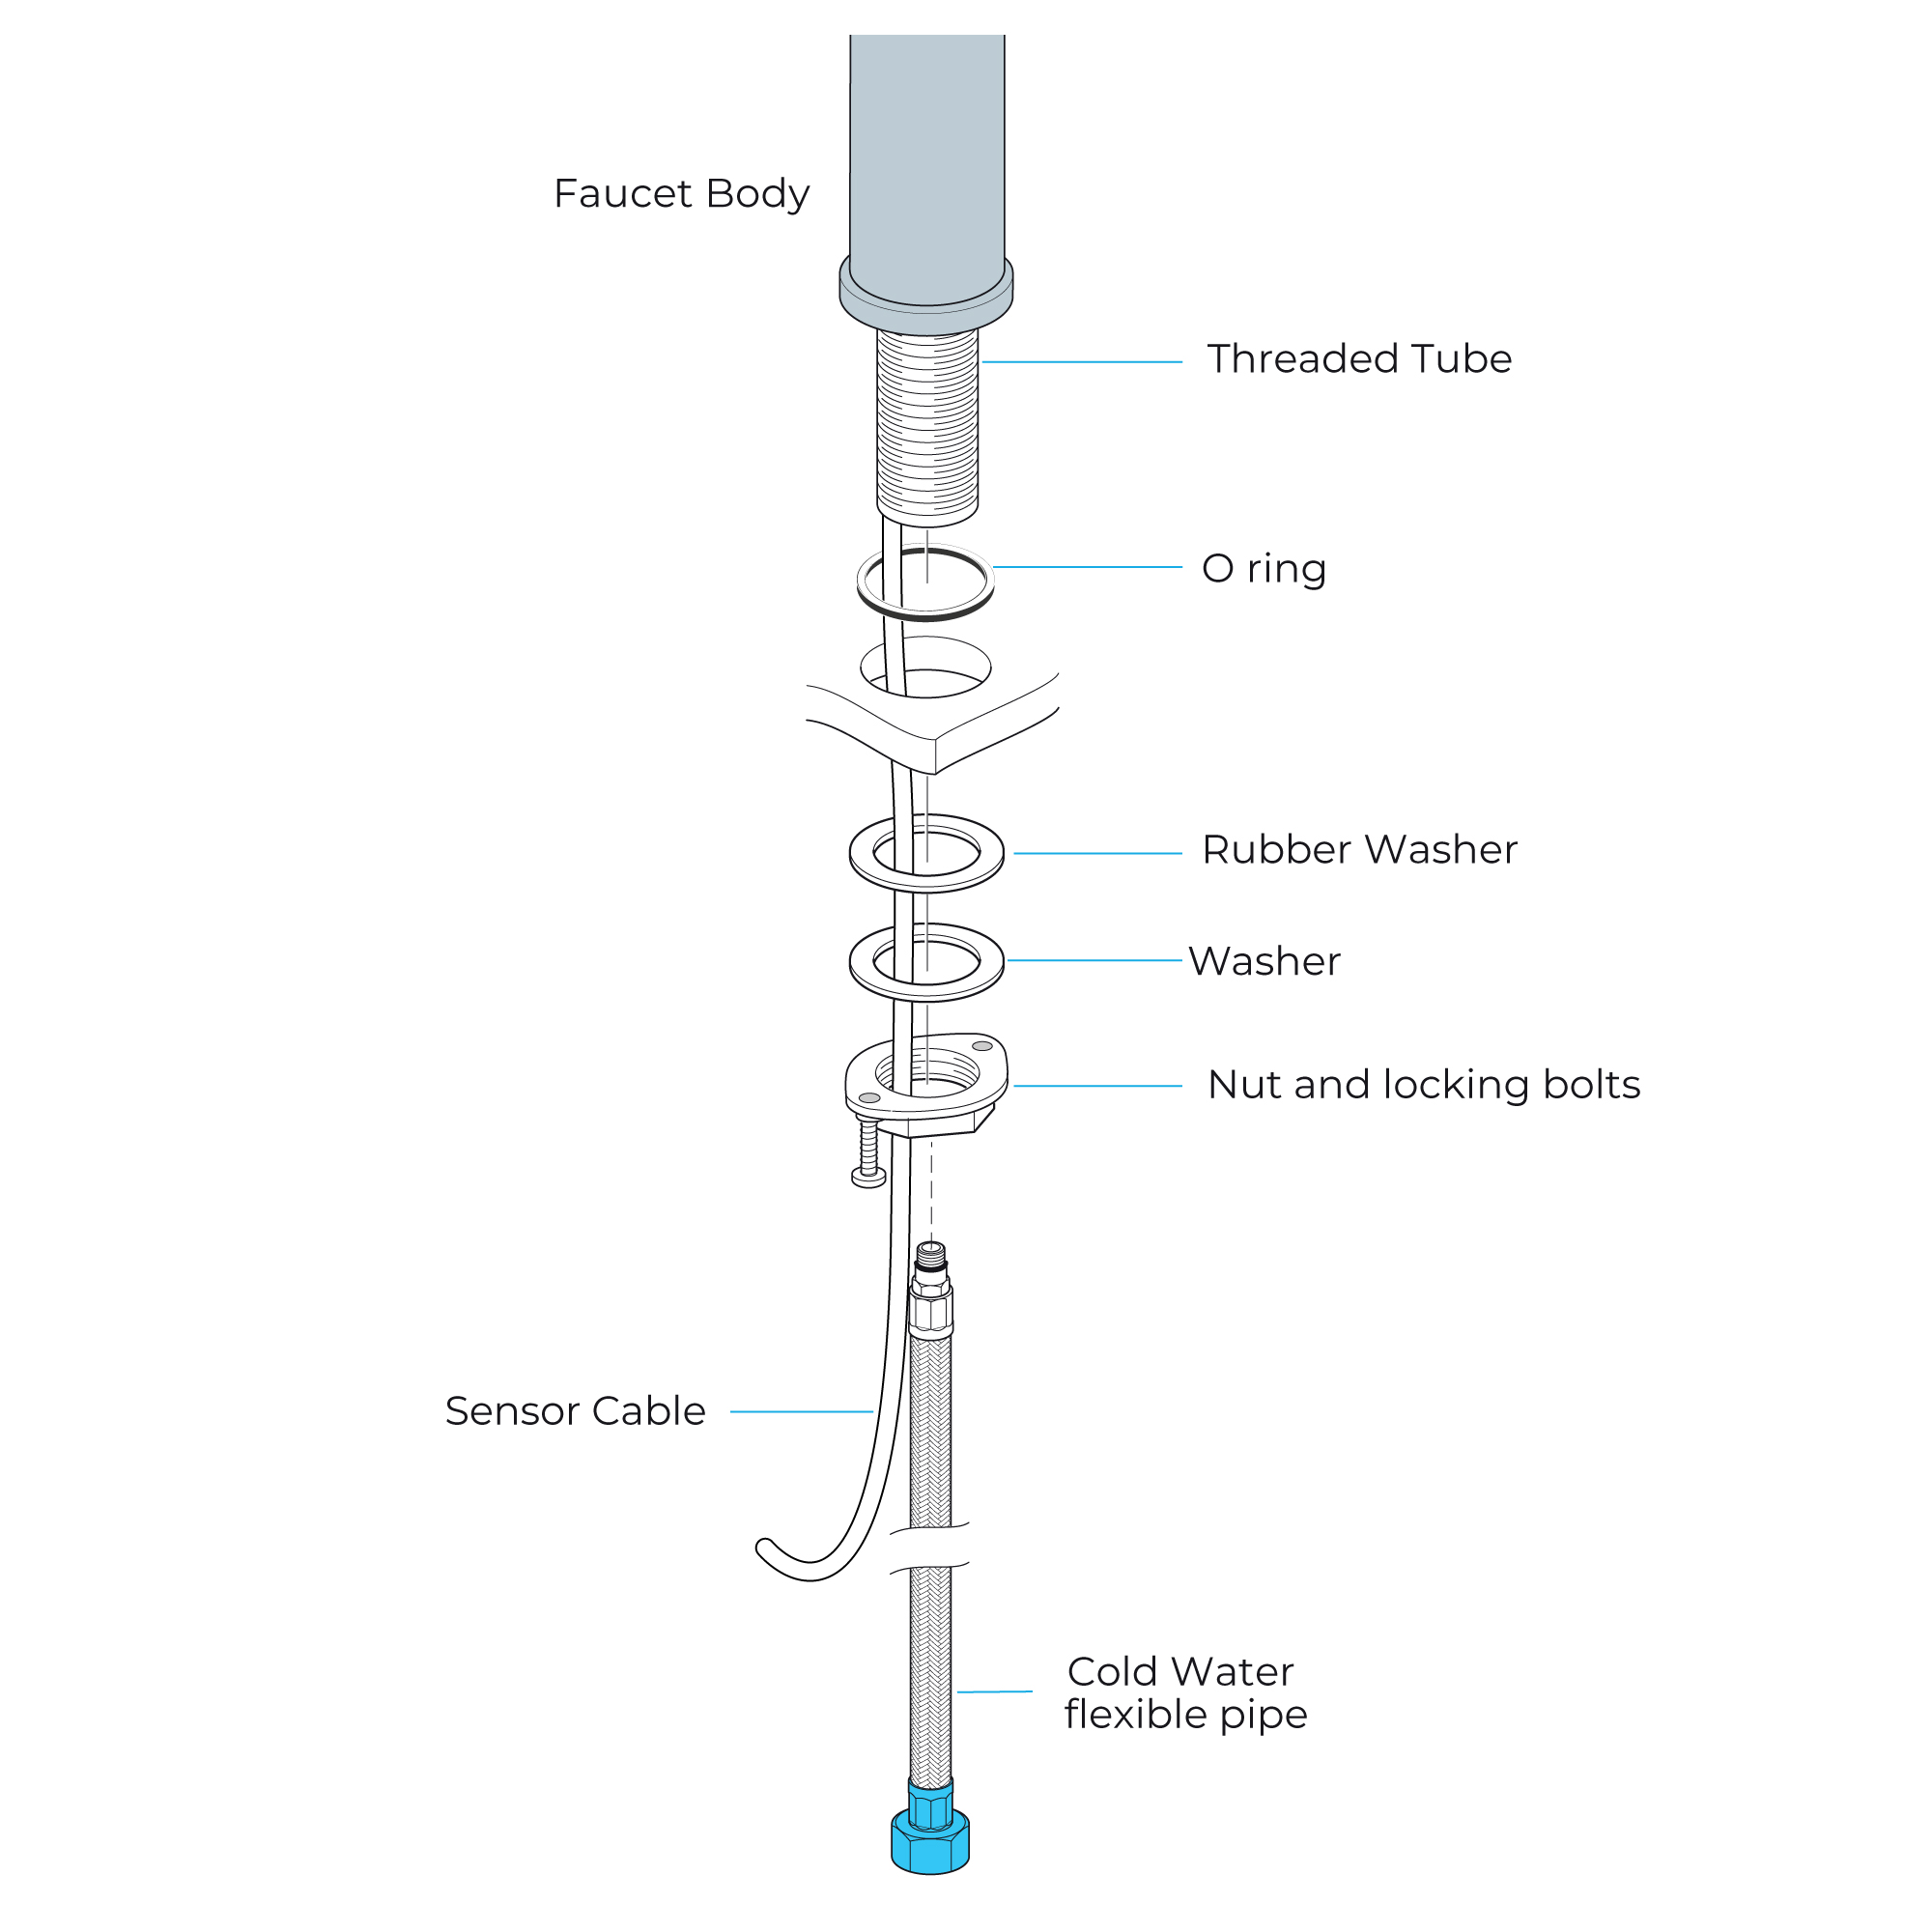
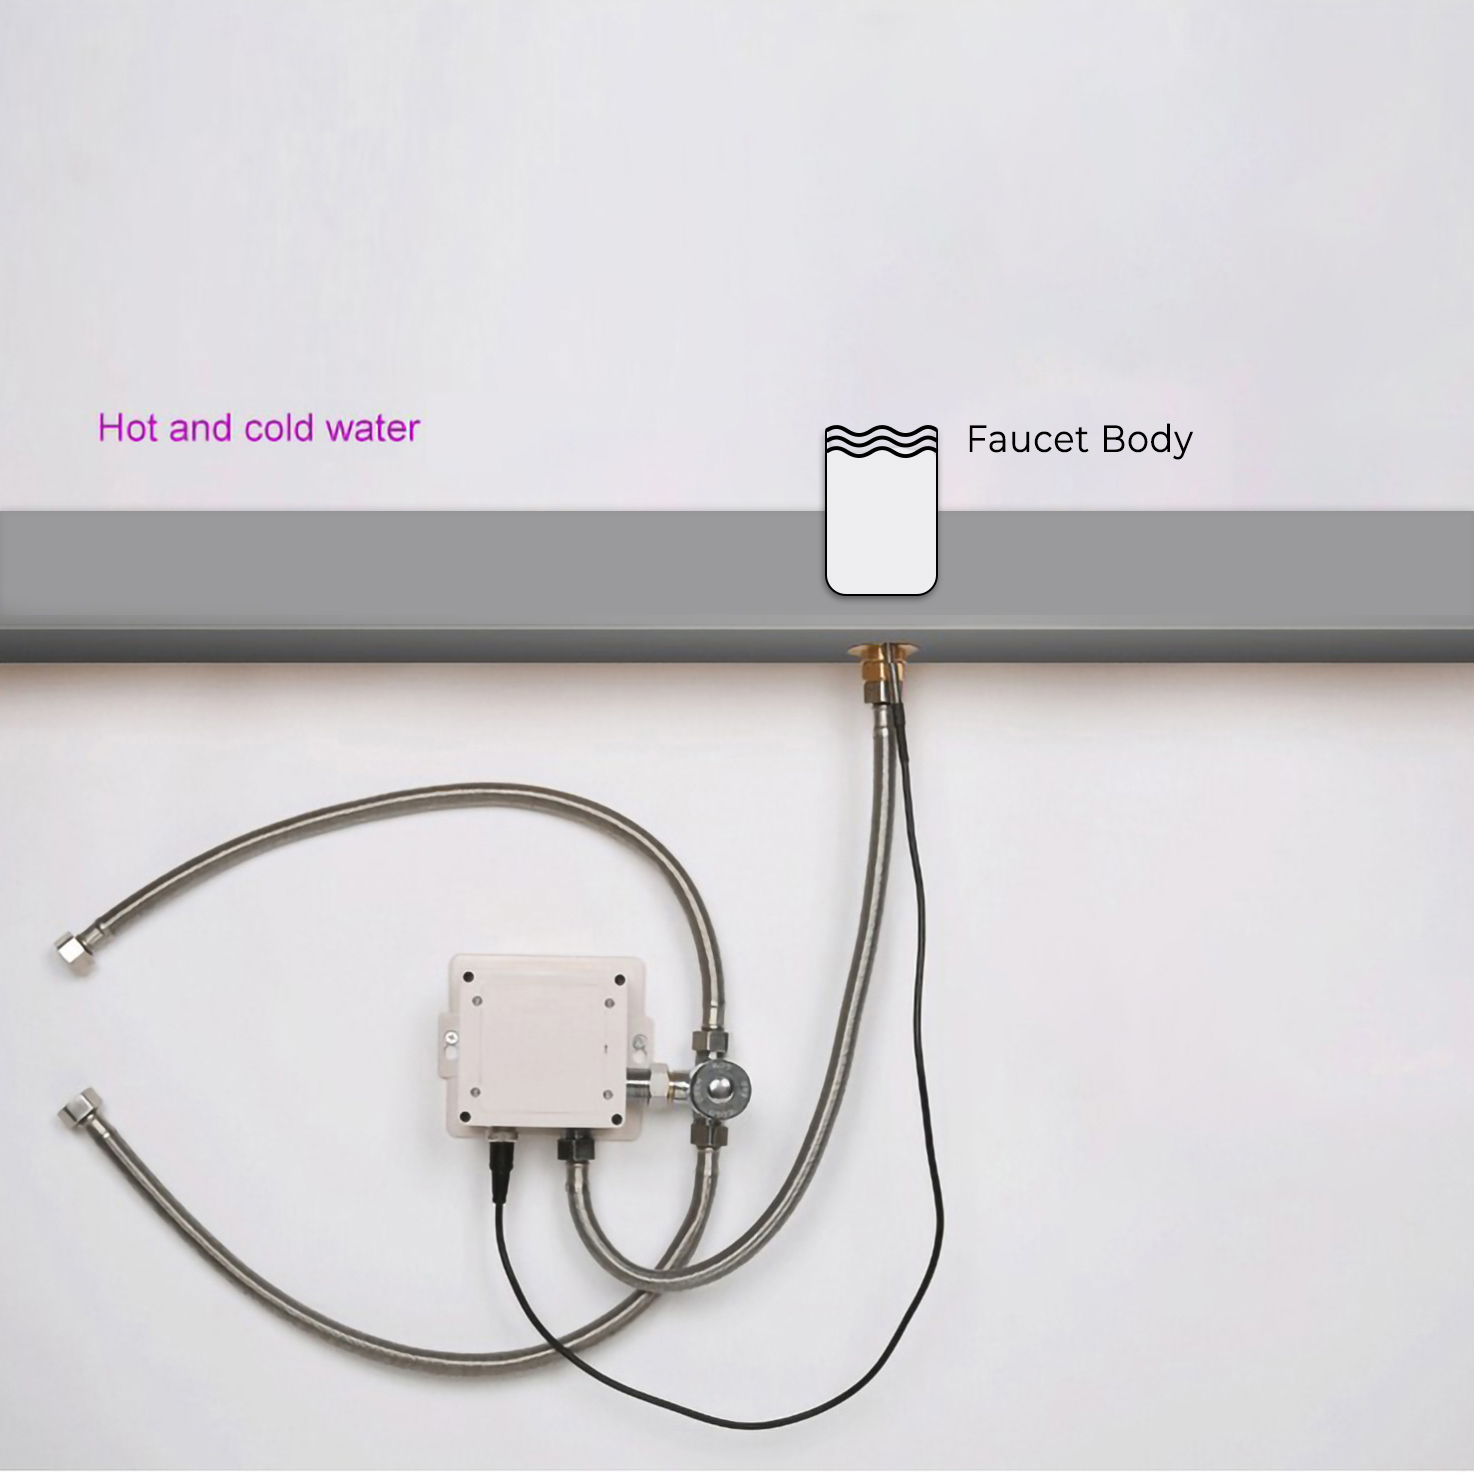
1.Screw the hose into the corresponding screw-hole of the faucet body. Fix the o-ring into the bottom groove of the faucet body.
2. Insert hose, threaded pipe and data cable through the drilled hole of the countertop. Put rubber washer and metal washer onto the threaded pipe, screwing in mounting nut. Adjust the faucet body correctly and tighten the mounting nut with screws.
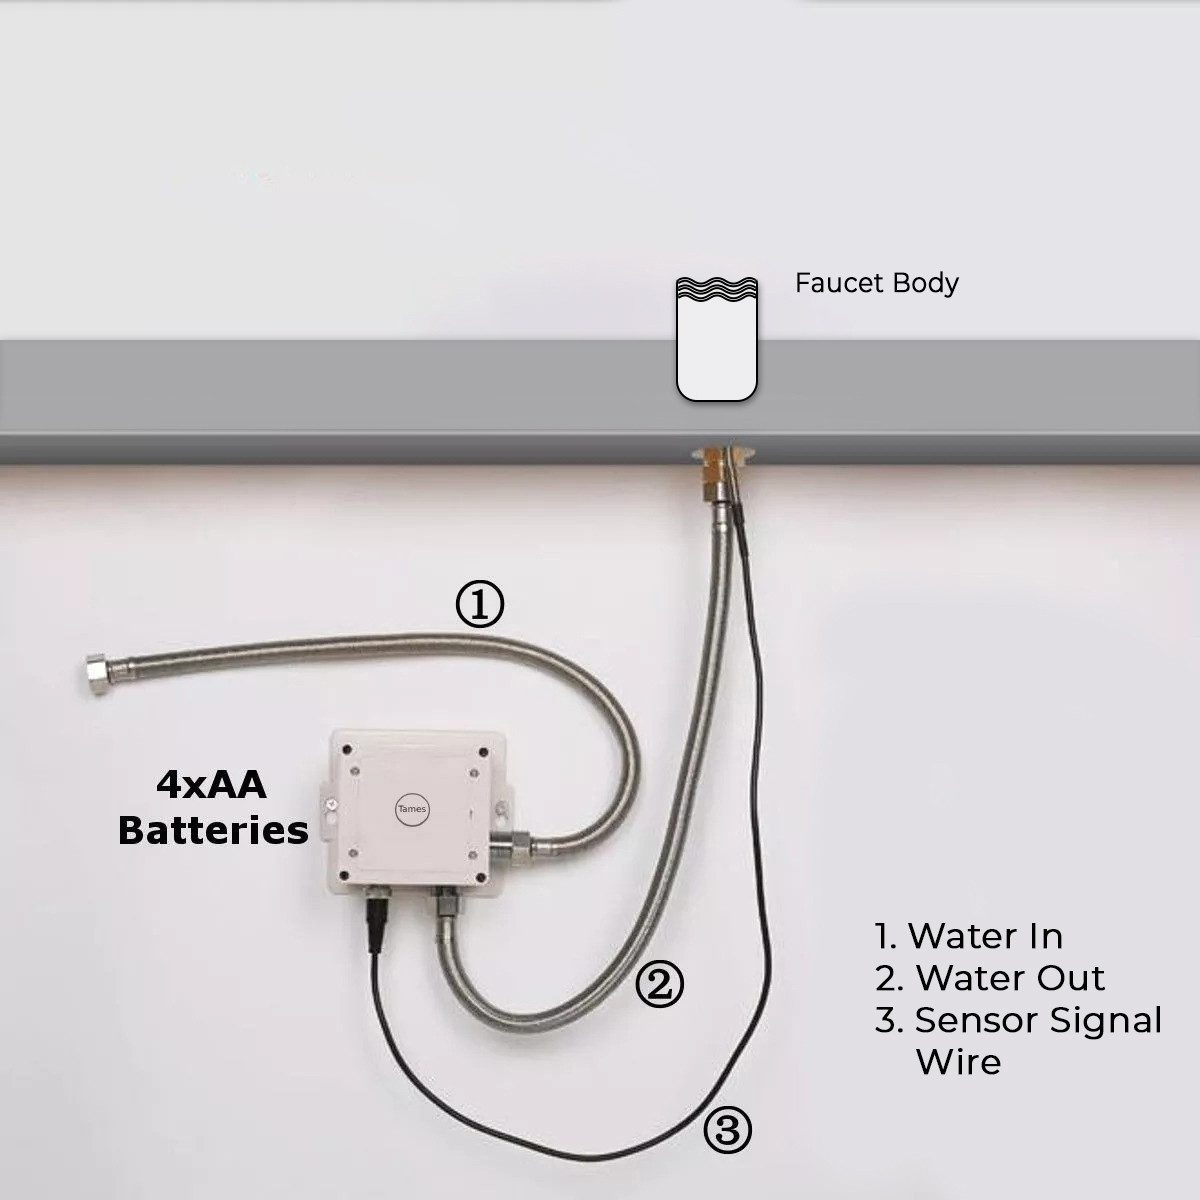
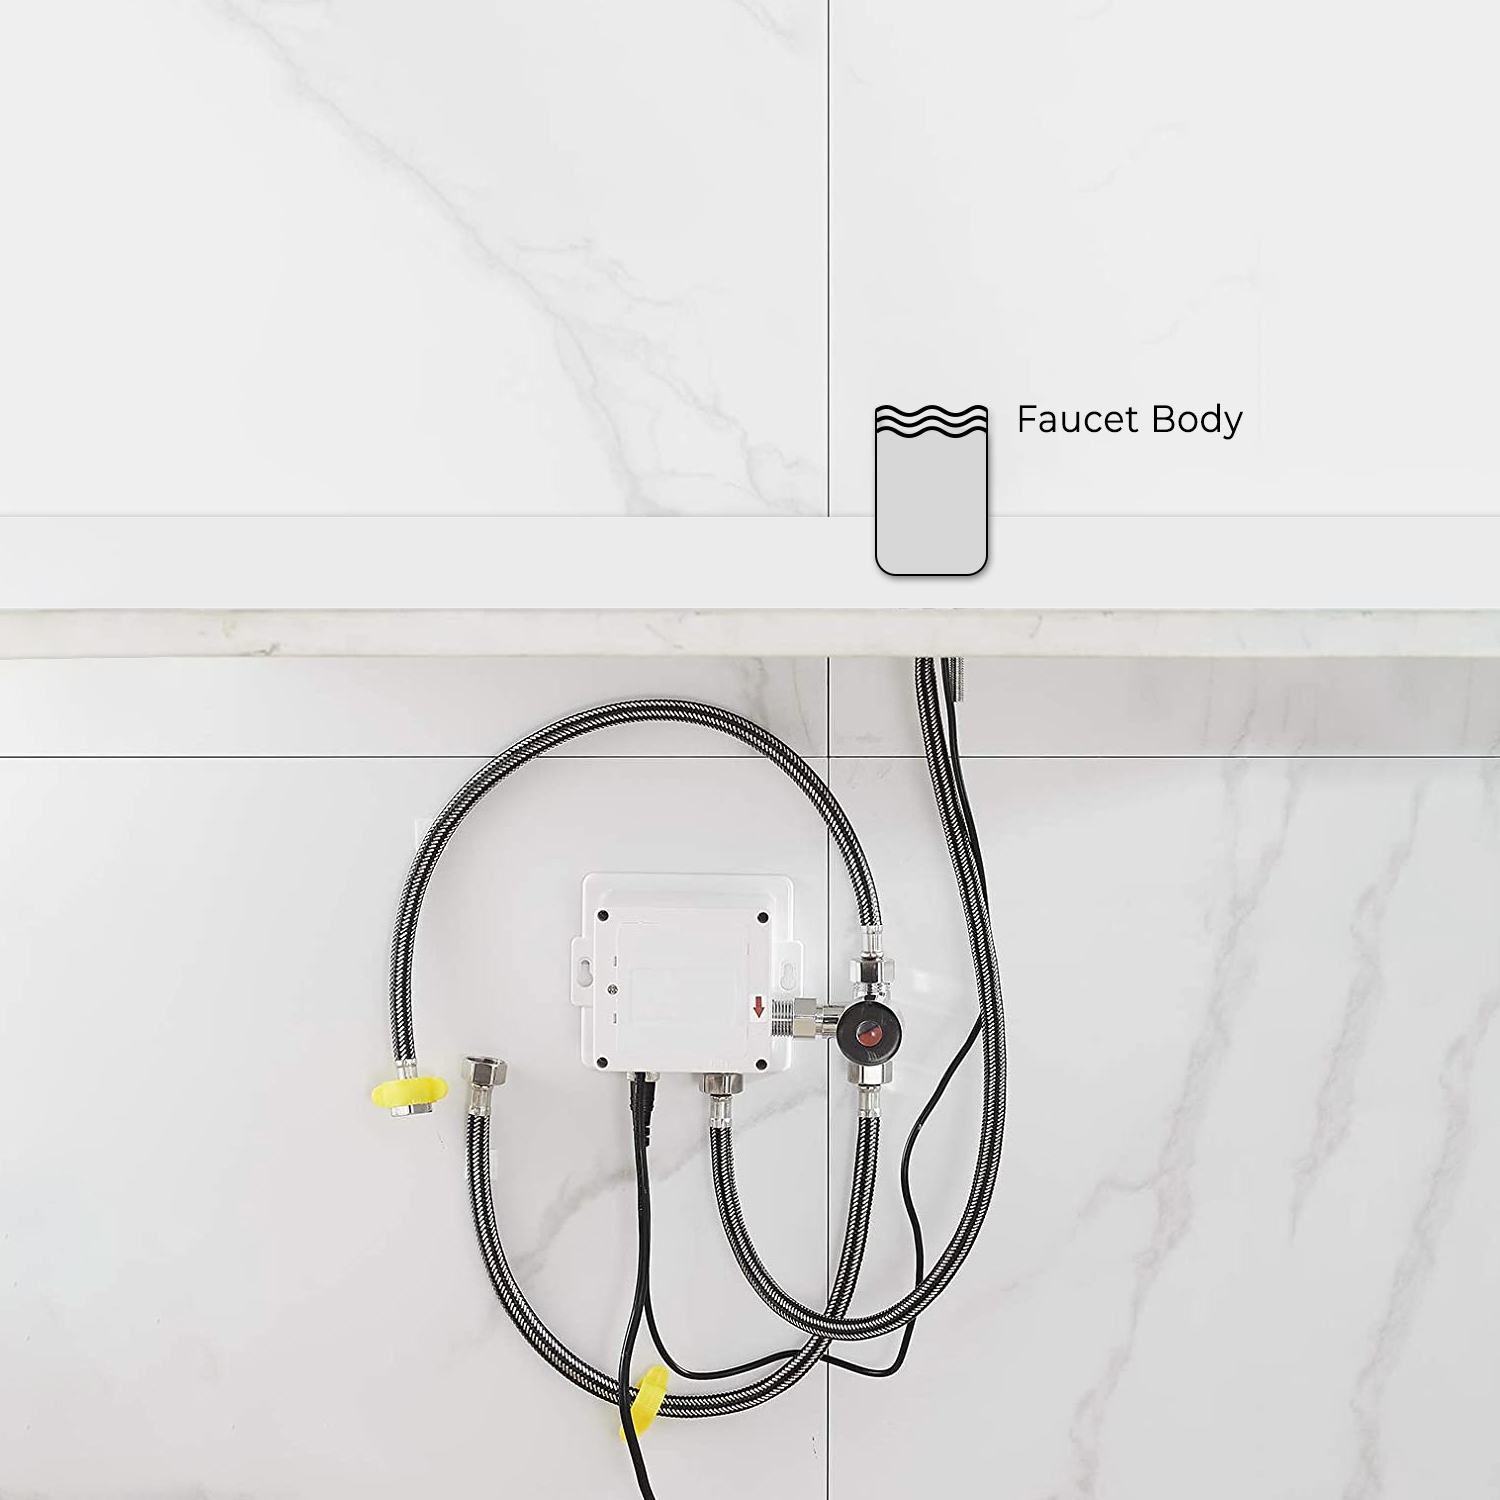
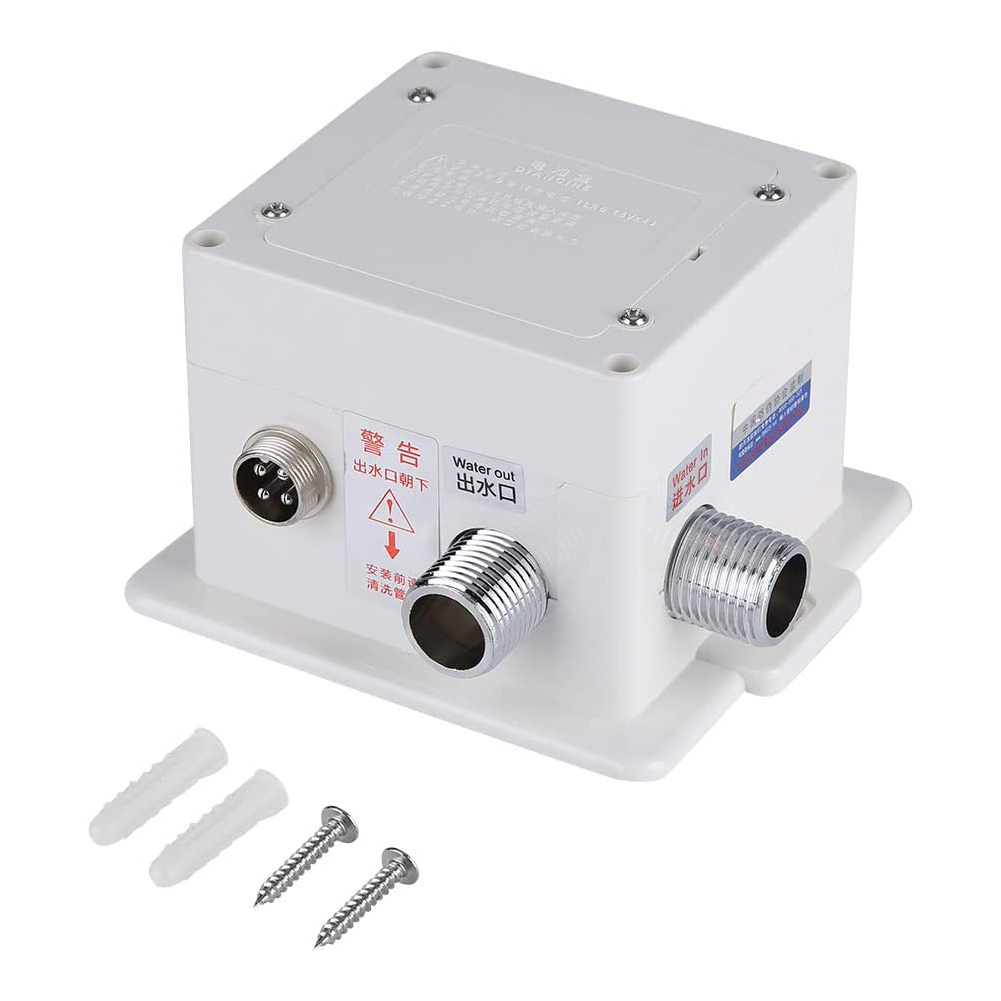
3. Install the control box to the wall and fix it with screws.
4. Add the rubber washer and screw supply elbow to the control box.
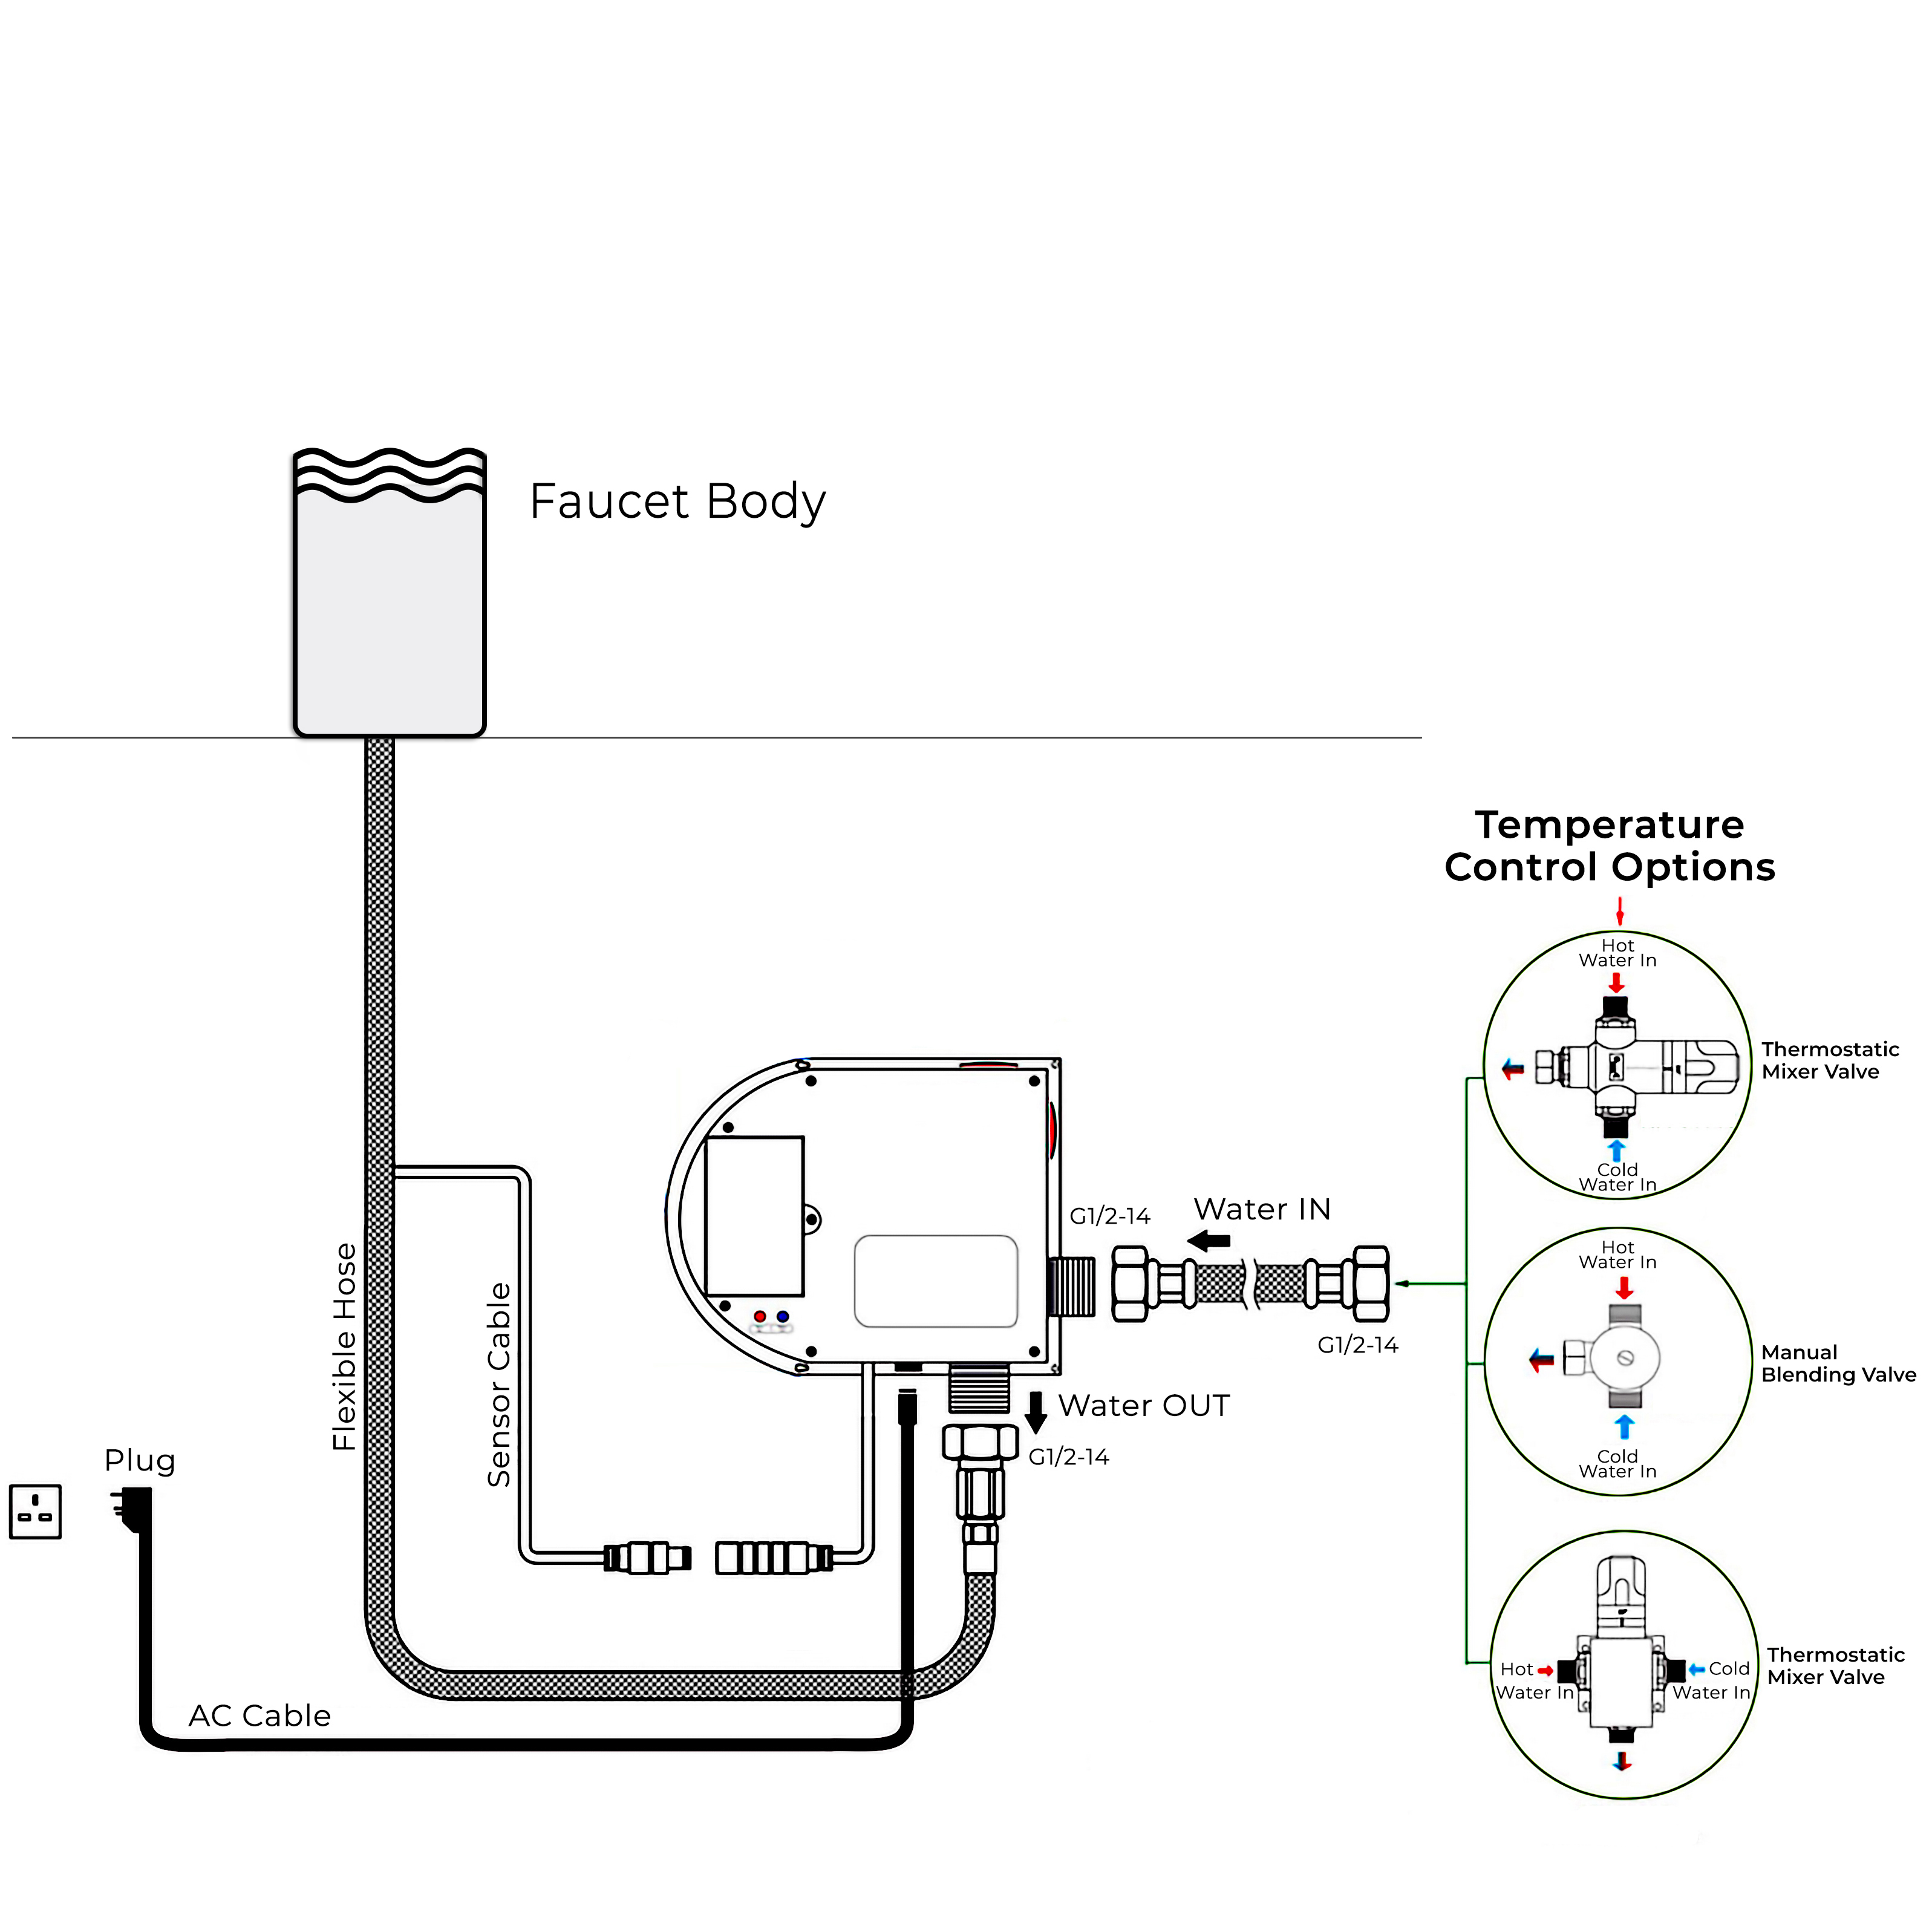
5. Add rubber washers and connect water lines to the hot and cold inlets of the supply elbow. Then connect the hose to the water outlet and insert data cable into the control box and plugin.
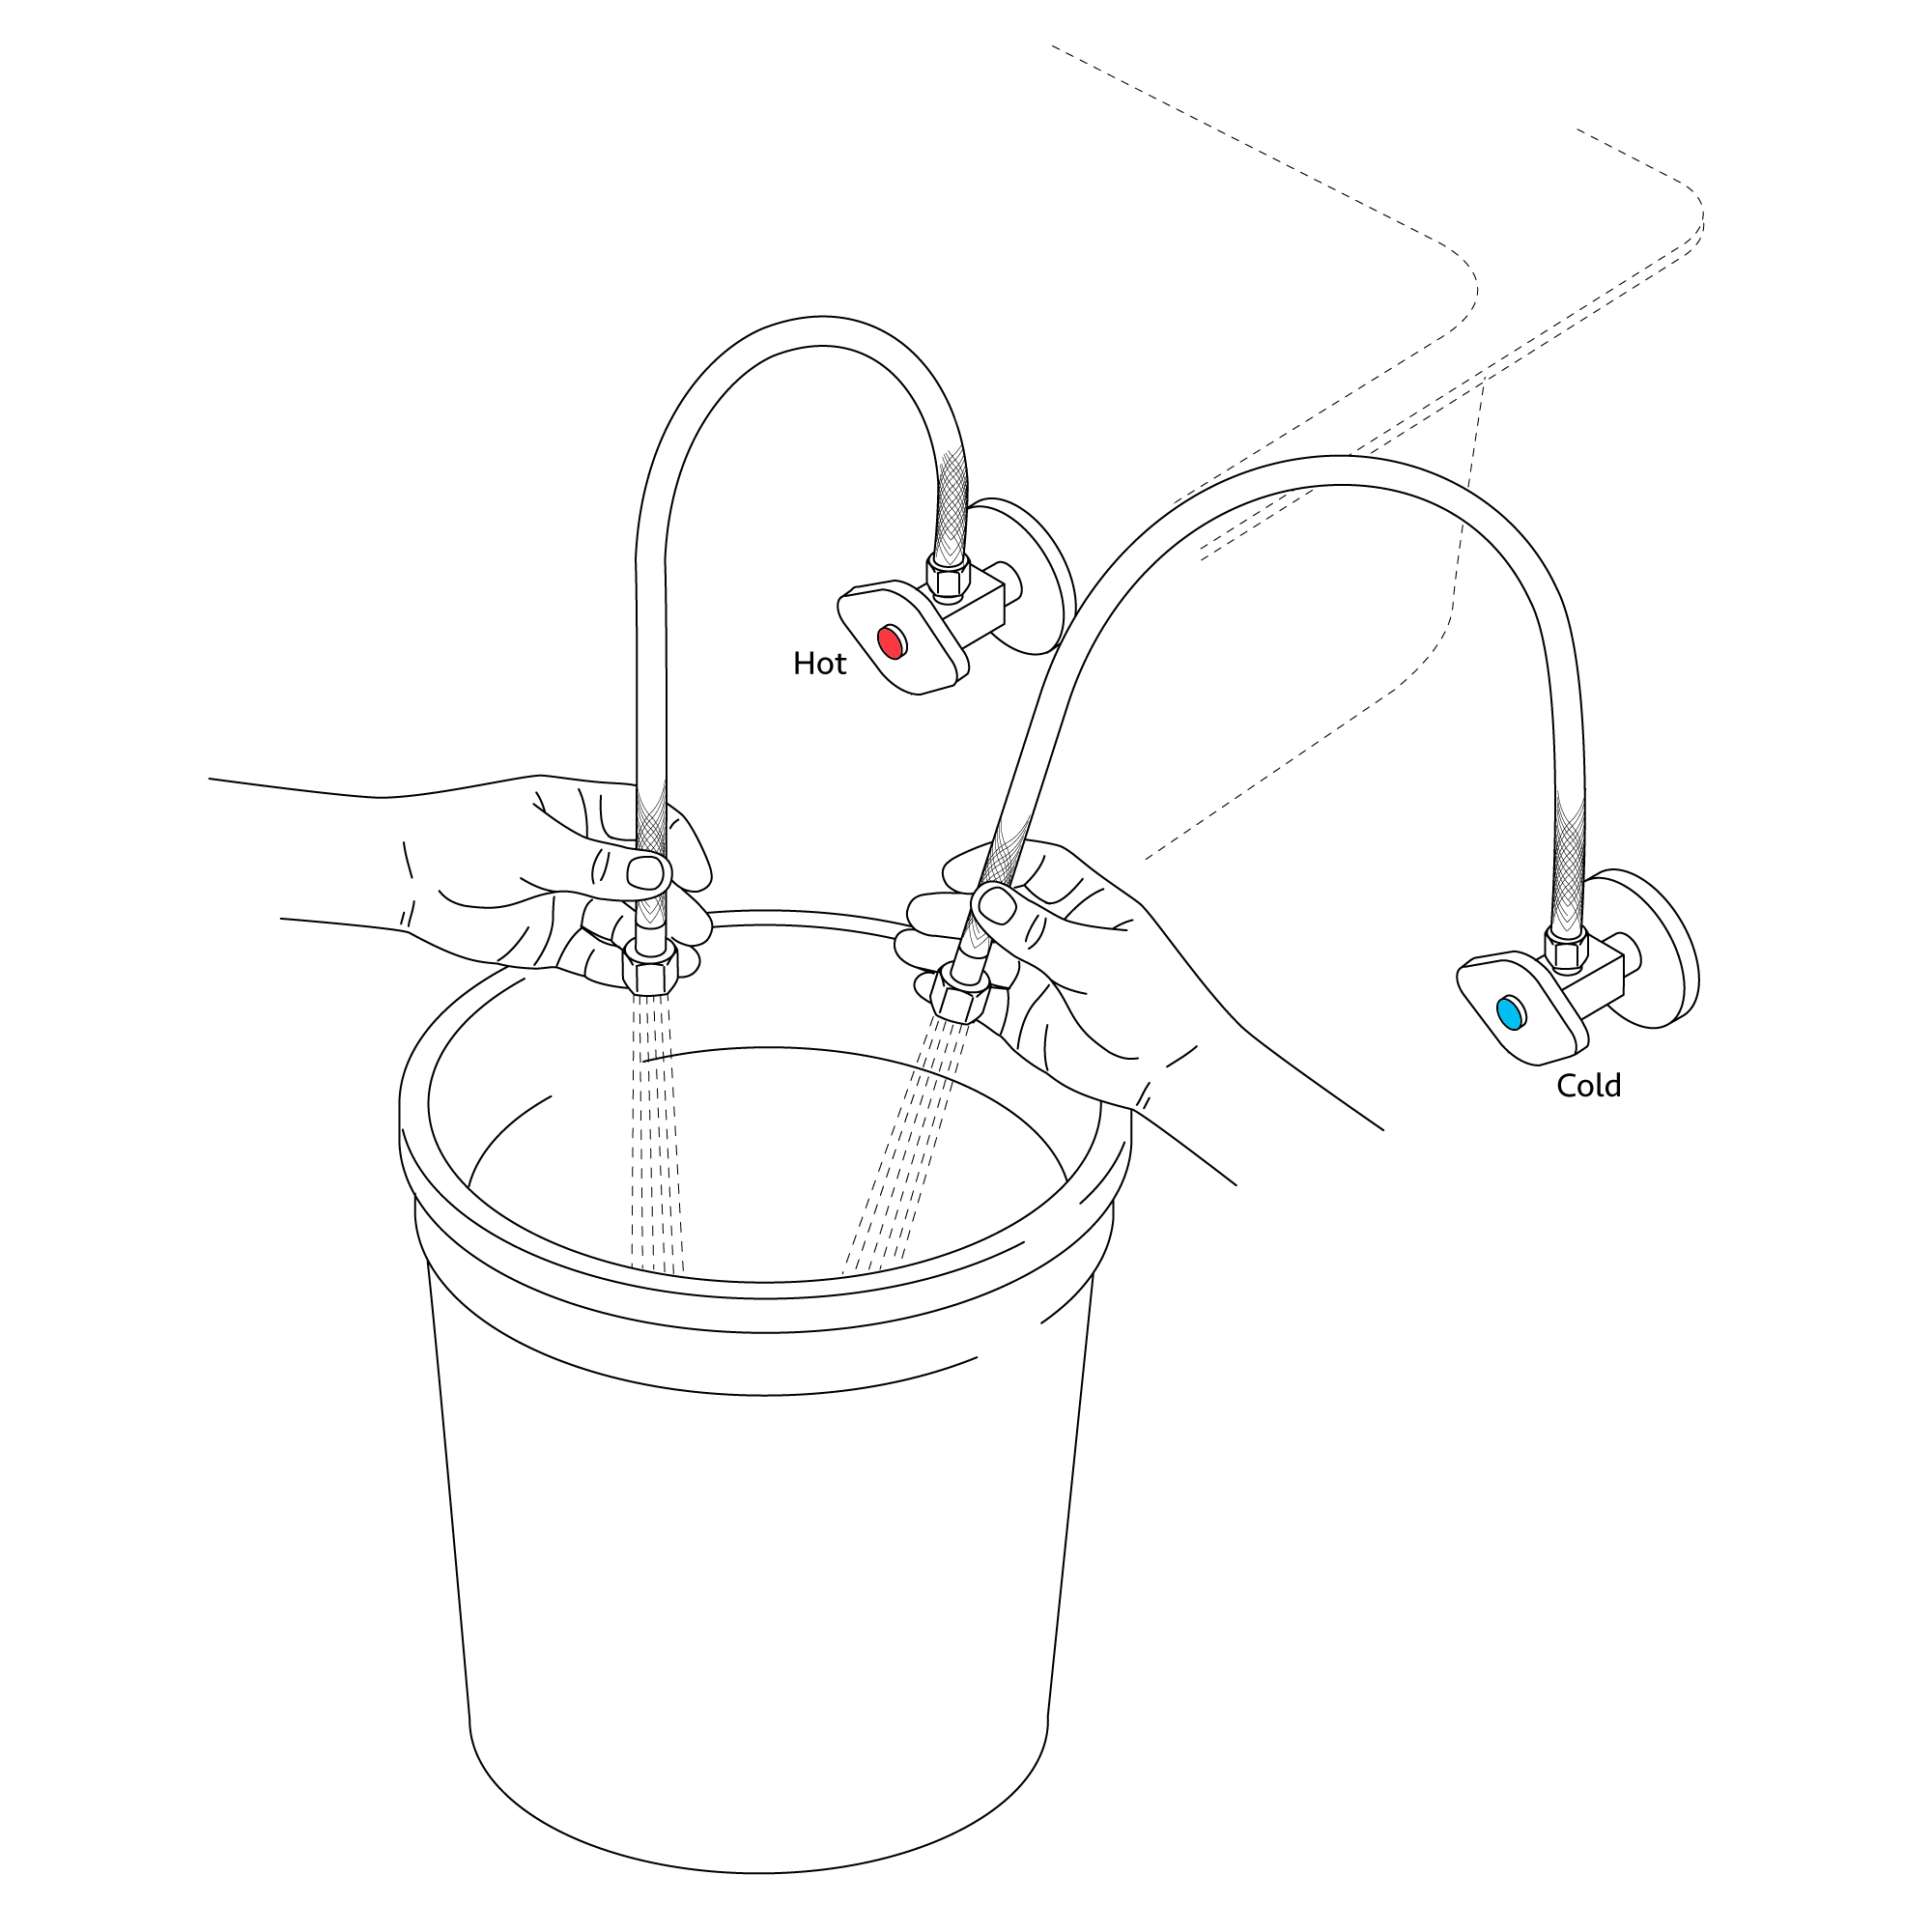
6. Make Connections to water supplies. Turn on hot and cold water supplies and flush water lines into a container for one minute. Important: This flushes away any debris that could cause damage to internal parts.
7. Connect waterlines to angle stops. Turn on the angle stops and check for leaks (DO NOT TURN FAUCET ON).
8. Turn the faucet on for 1 minute to flush any debris.
2. Insert hose, threaded pipe and data cable through the drilled hole of the countertop. Put rubber washer and metal washer onto the threaded pipe, screwing in mounting nut. Adjust the faucet body correctly and tighten the mounting nut with screws.
3. Install the control box to the wall and fix it with screws.
4. Add the rubber washer and screw supply elbow to the control box.
5. Add rubber washers and connect water lines to the hot and cold inlets of the supply elbow. Then connect the hose to the water outlet and insert data cable into the control box and plugin.
6. Make Connections to water supplies. Turn on hot and cold water supplies and flush water lines into a container for one minute. Important: This flushes away any debris that could cause damage to internal parts.
7. Connect waterlines to angle stops. Turn on the angle stops and check for leaks (DO NOT TURN FAUCET ON).
8. Turn the faucet on for 1 minute to flush any debris.
Flexible Connecting Hose Care must be taken when connecting the flexible connection hose from the power supply box to the spout to ensure it does not bend sharply and kink or twist. See above for recommended ways to fit the flexible connecting hose.
Important: Failure to follow these guidelines may result in poor performance and damage to the flexible connection hose.
Control Box Installation Instructions
Step 1:
Step 2:
control box
Step 3:
Step 4:
5" size
Step 5:
Step 6:
Step 7:
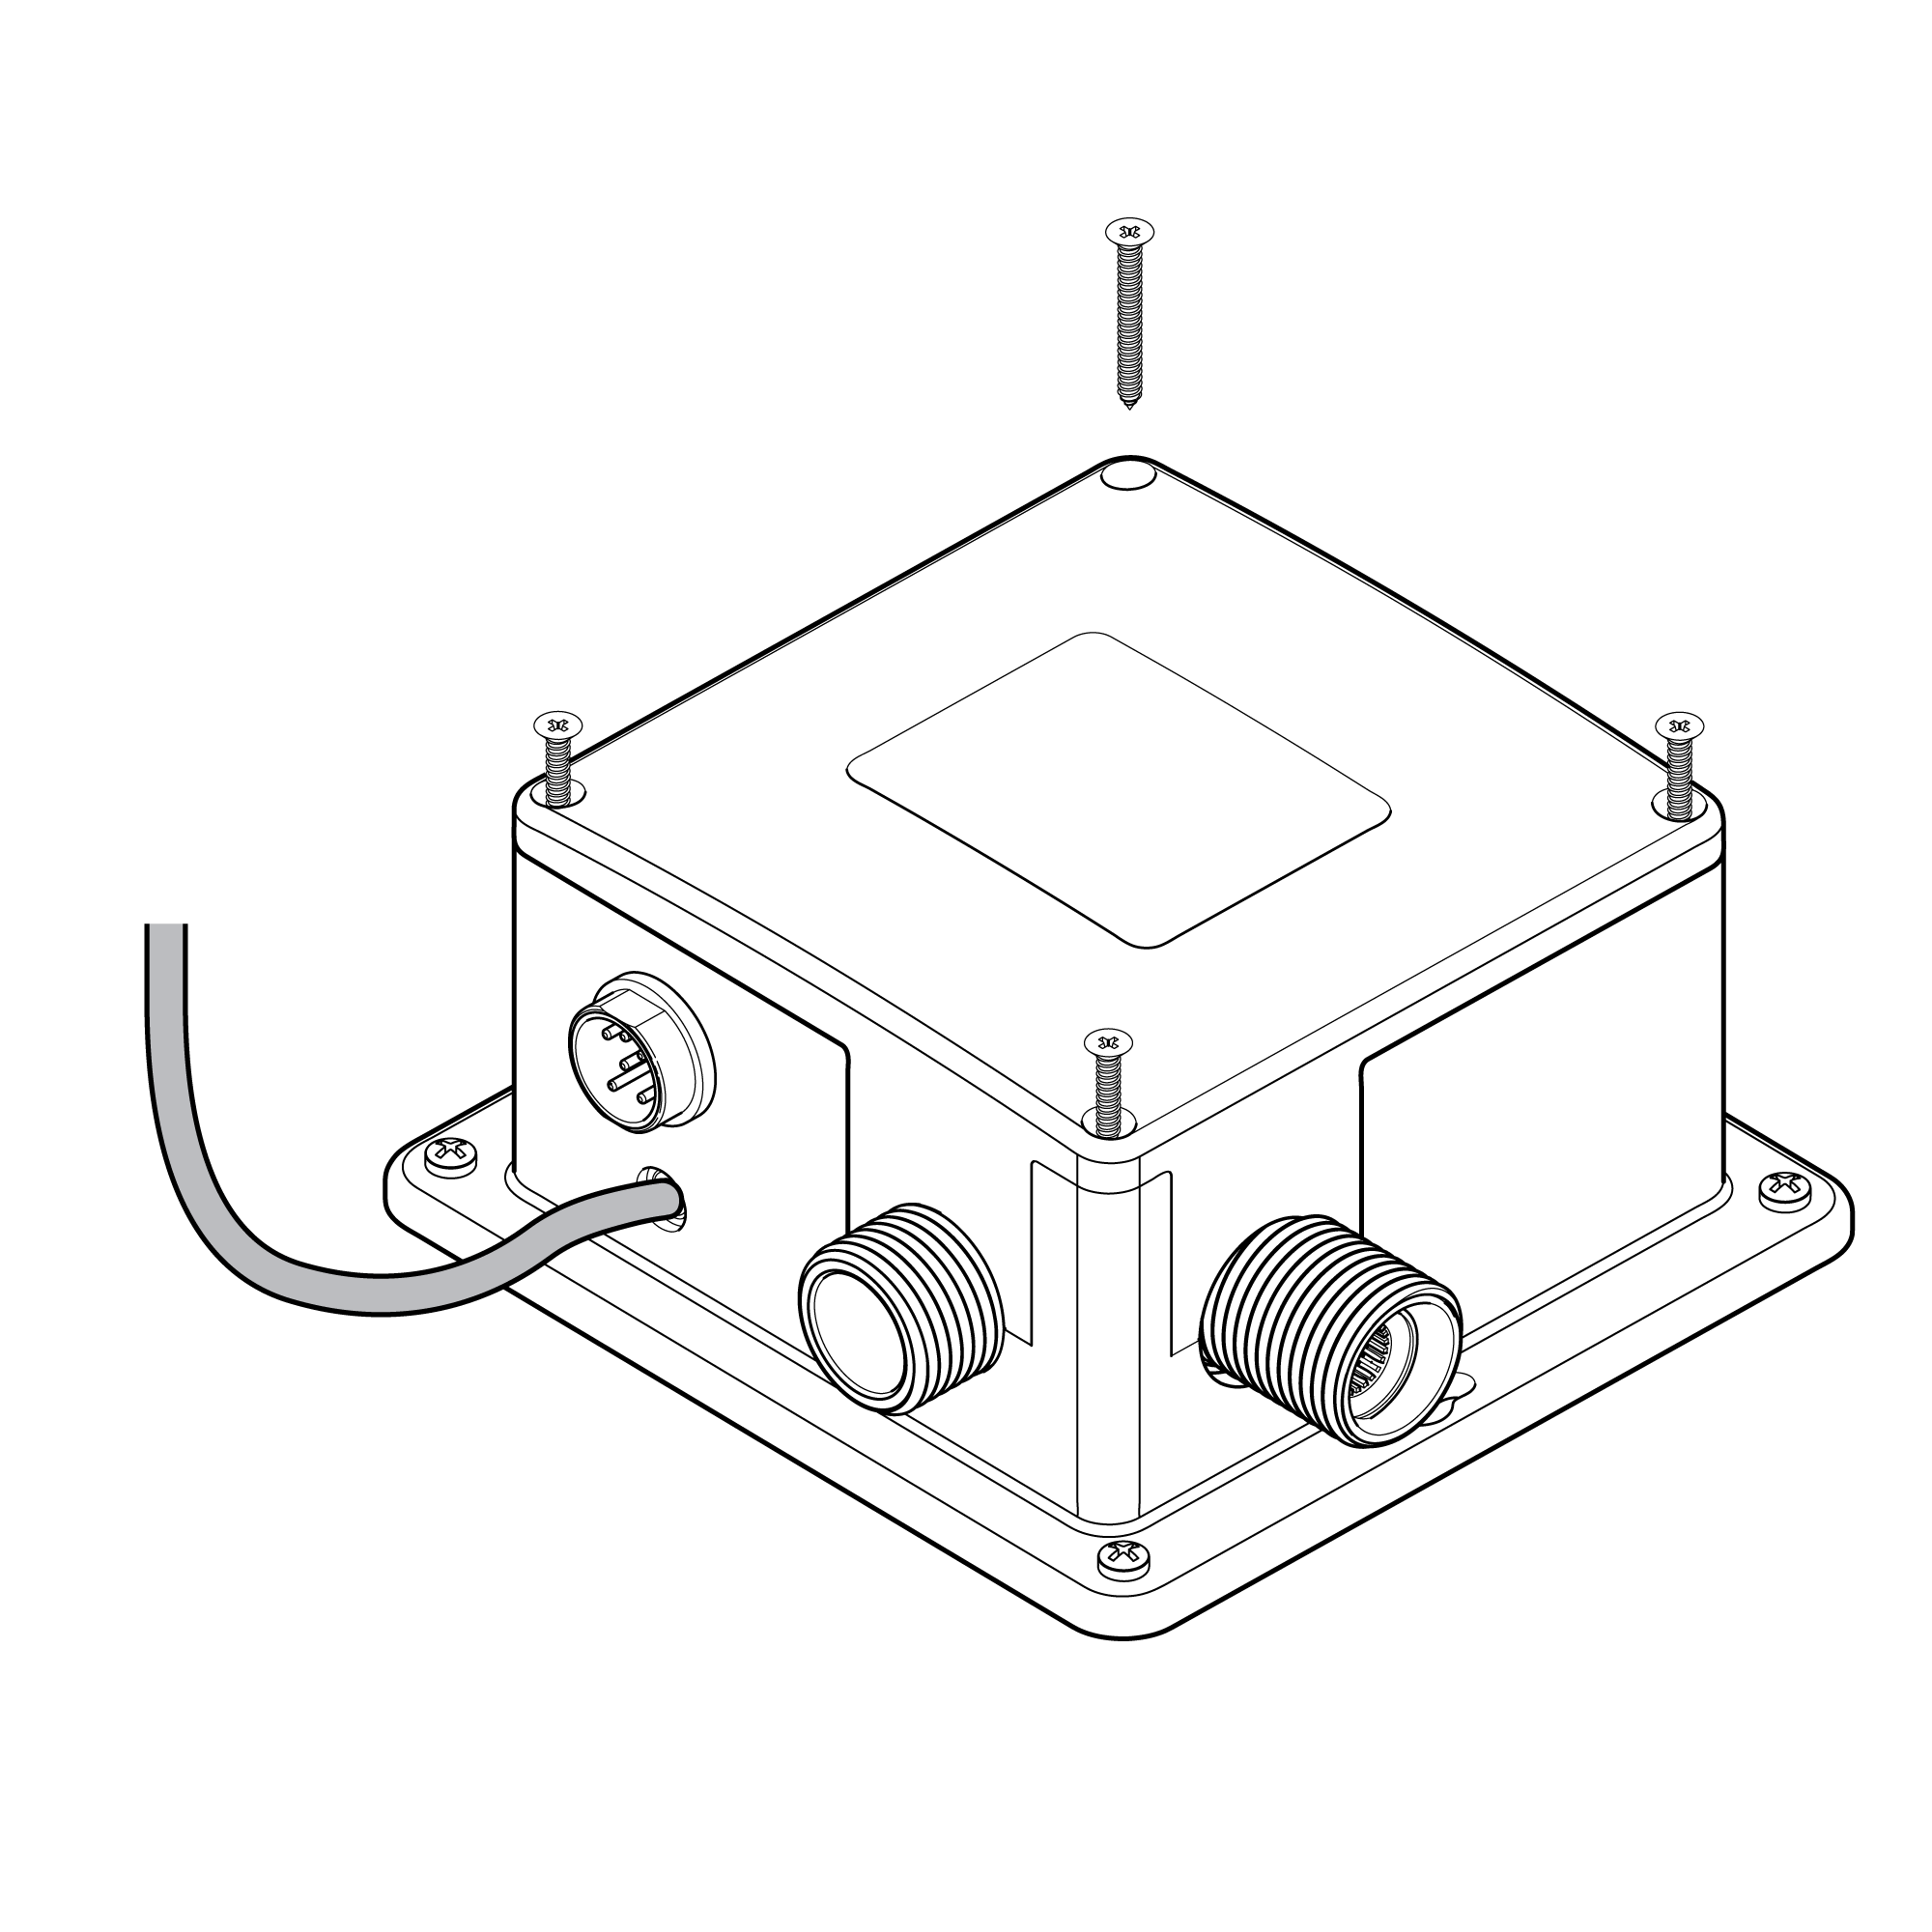
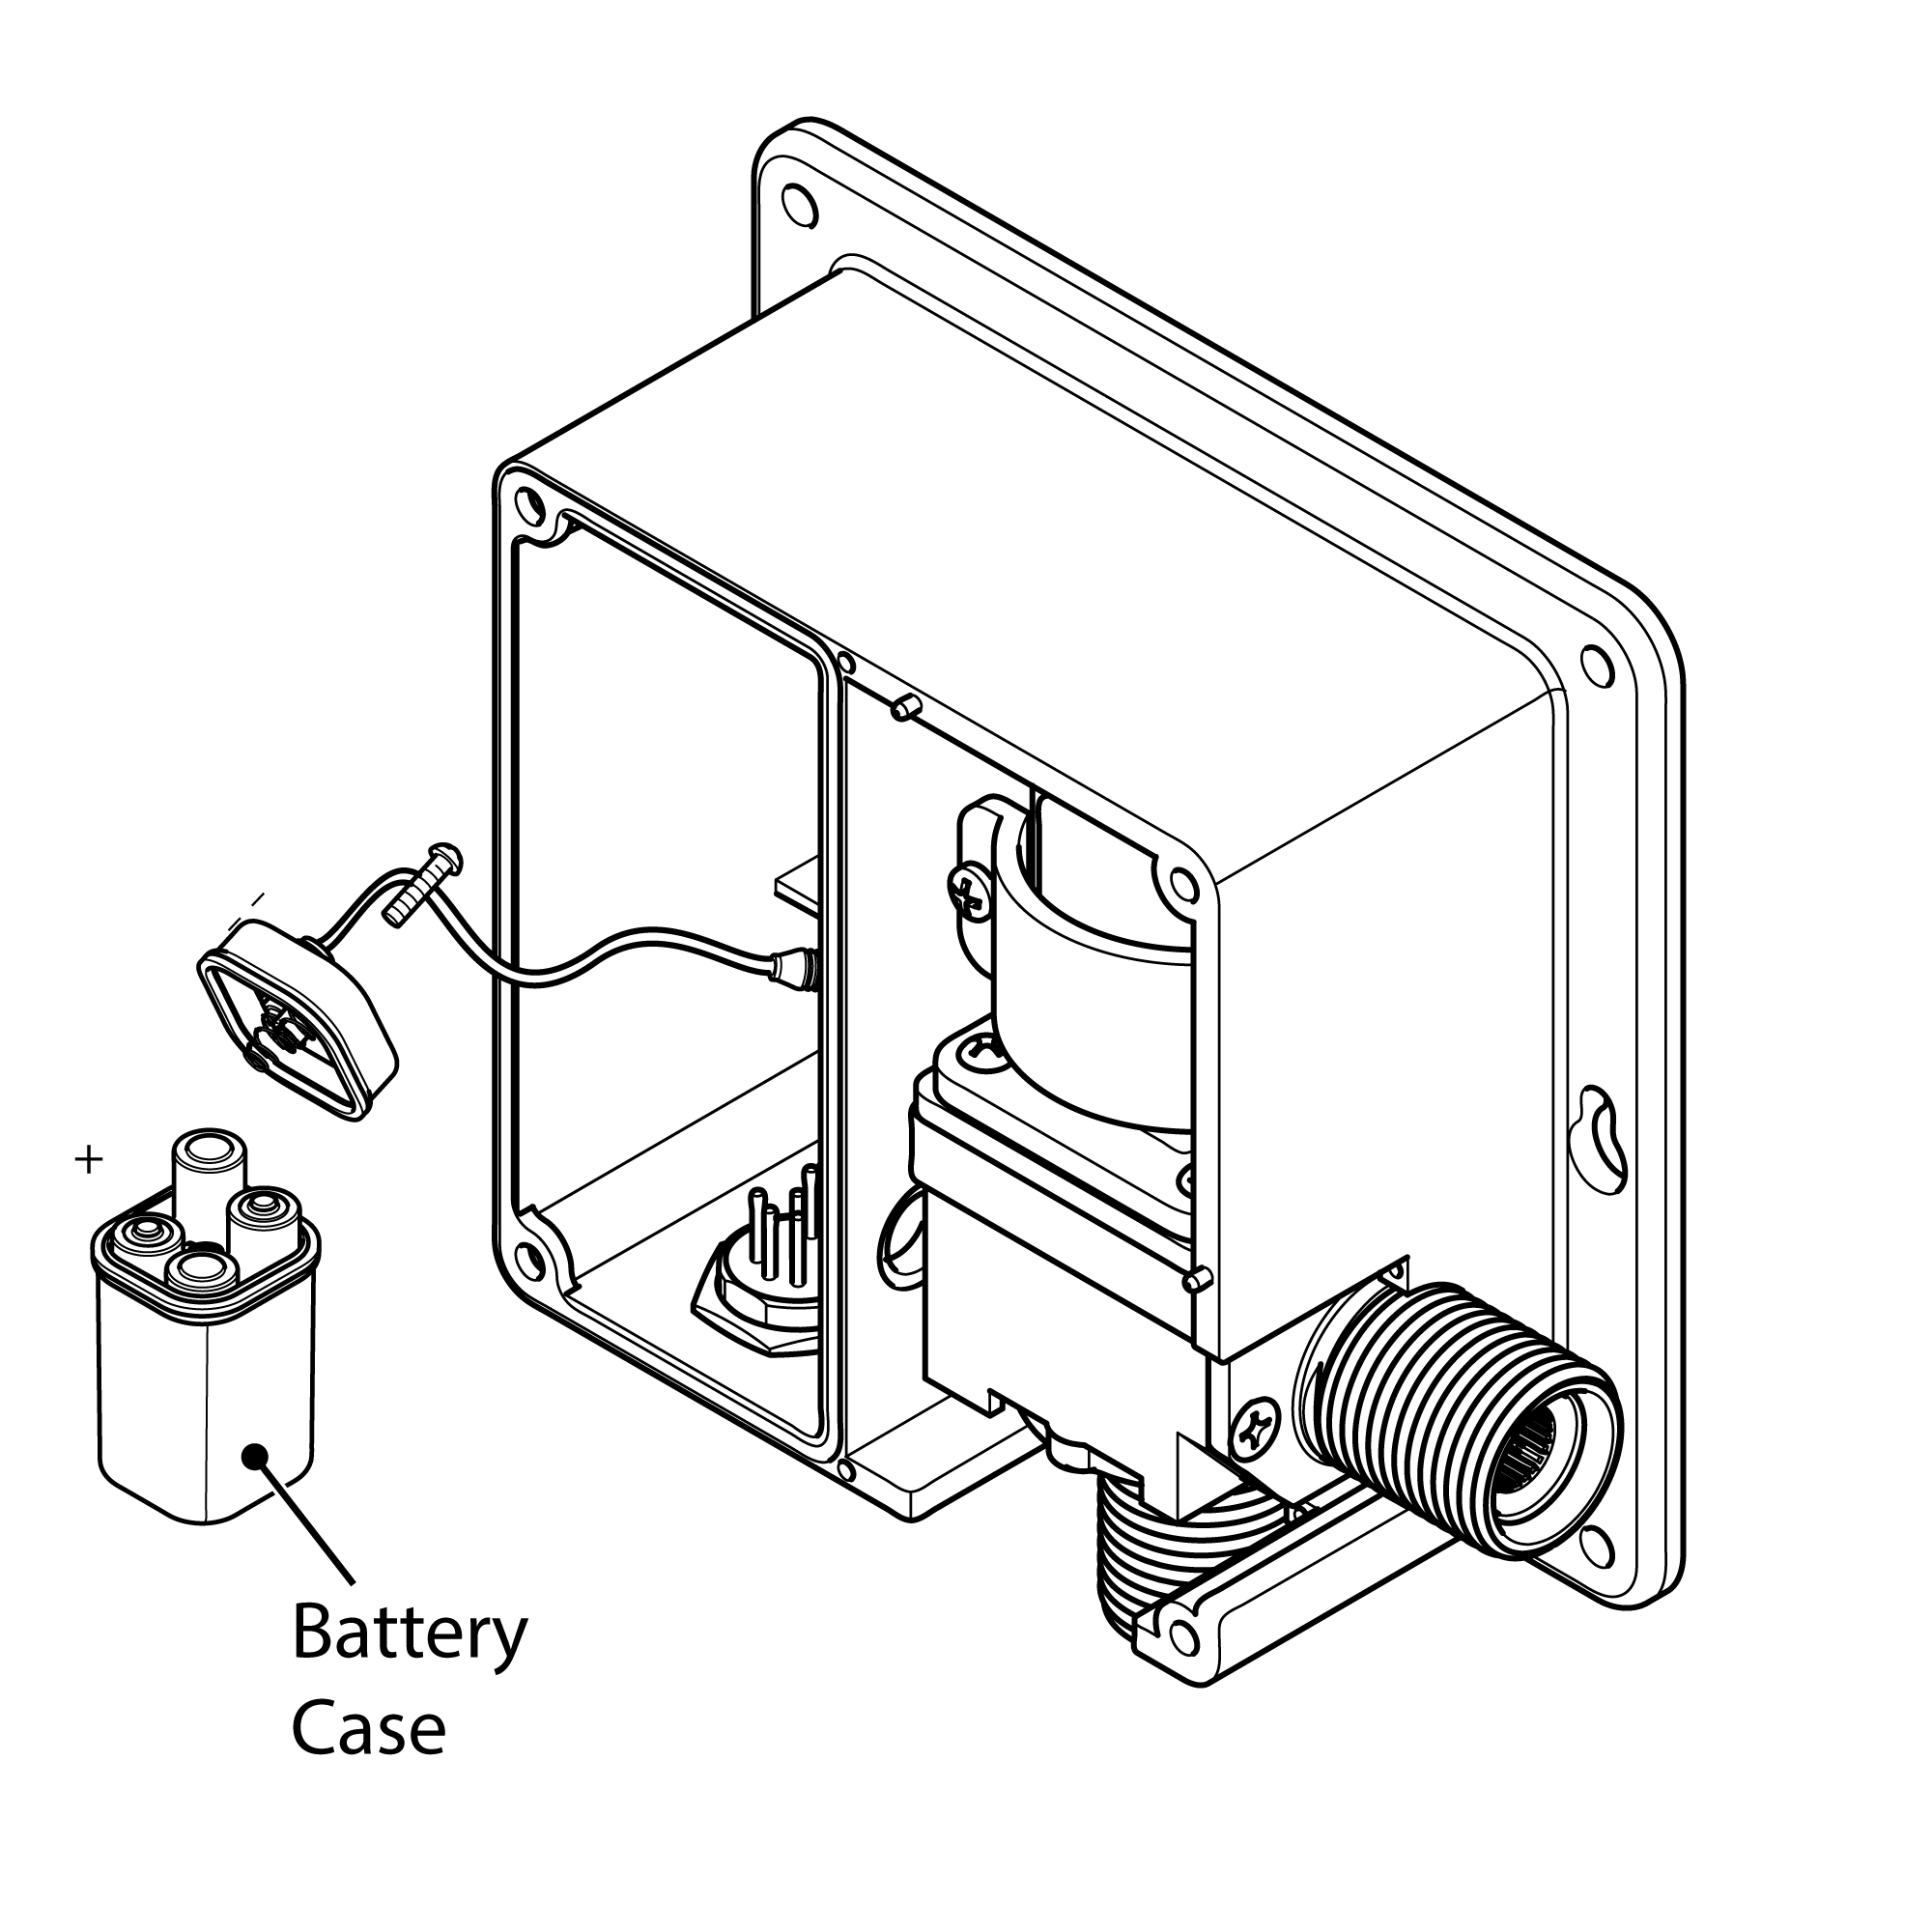
Control Box Installation 1. Remove the four screws from the control box. Remove the control box cover. Remove the battery box from the control box, and gently remove the screw from the battery box cover. Install AA batteries in the orientation shown. Note: Use only alkaline AA batteries. Re-install the battery box cover, matching the alignment arrows together. Set the battery box back into the control box, and re-install the control box cover using the previously removed screws.
2. Choose a location under the sink basin to mount the control box, such that the sensor cable, flexible hose, and incoming water supply all connect to the control box. Under the sink basin, drill a hole minimum 3/4” to fit the sensor cable and flexible hose from the spout. Feed the sensor cable and flexible hose through the hole.
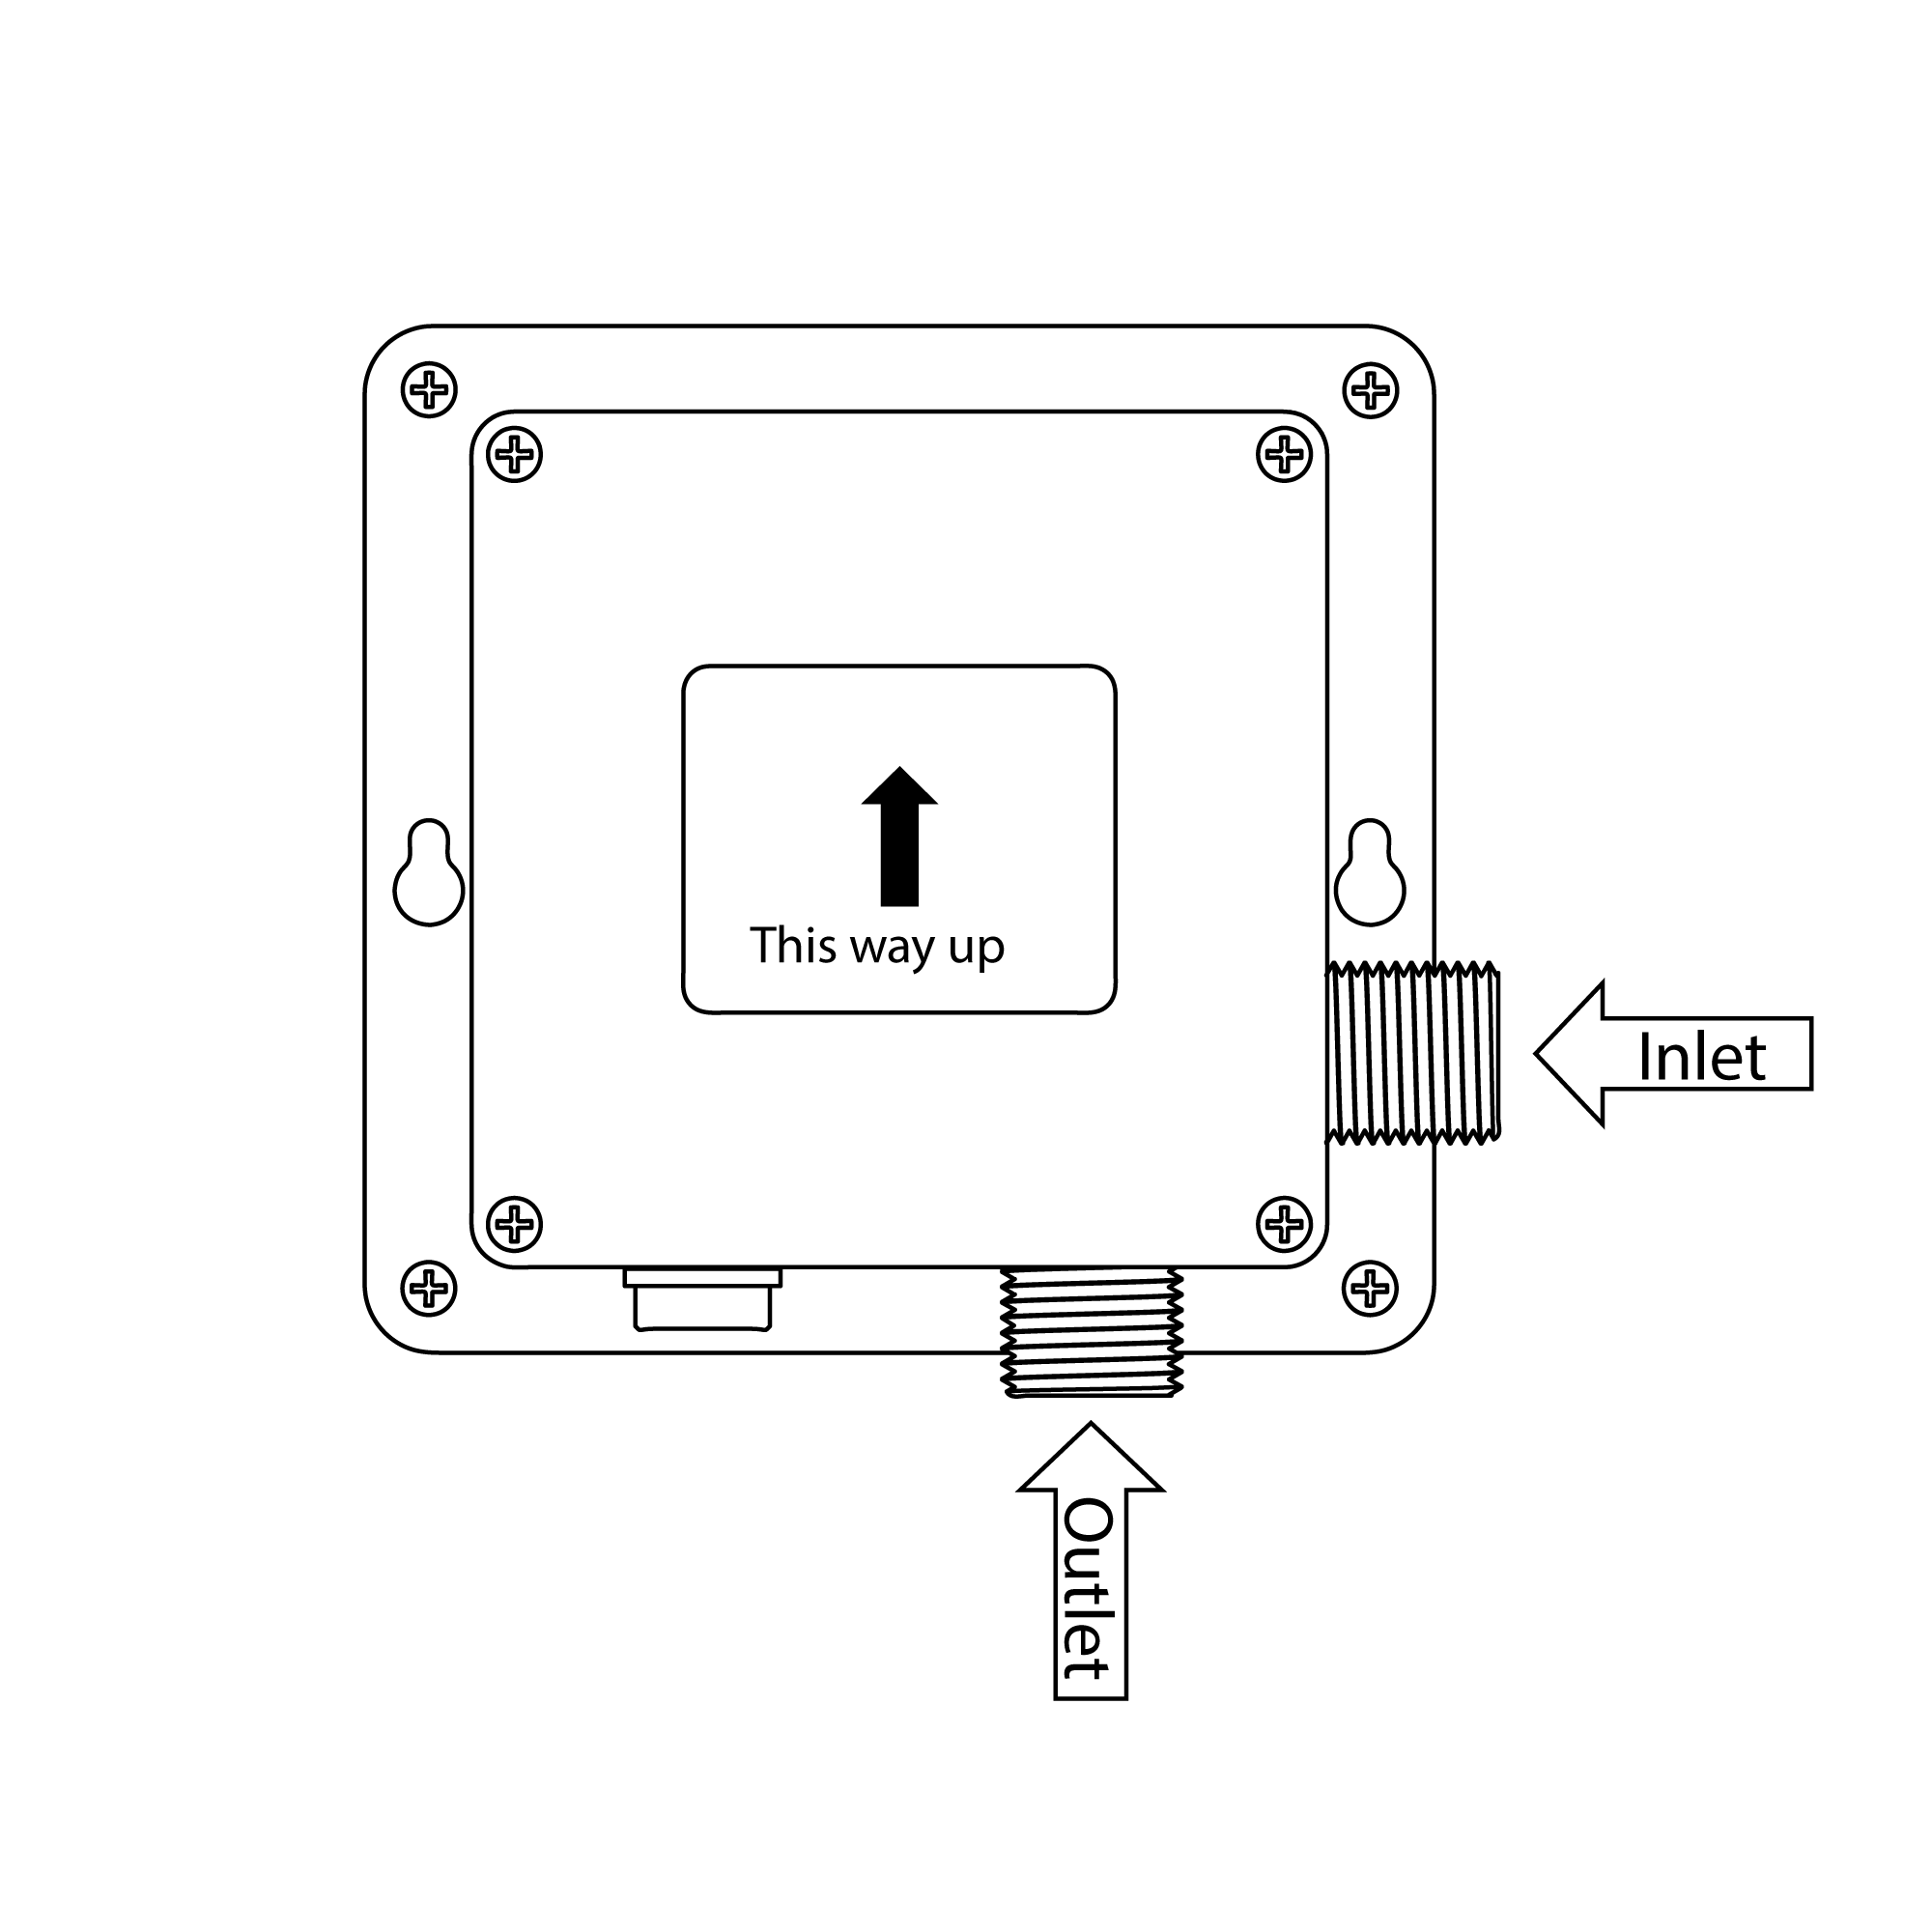
3. Mount the control box to the wall in the orientation shown. Drill four 1/8" (3mm) holes, and push drywall anchors into each hole. Secure the control box to the wall with the drywall screws.
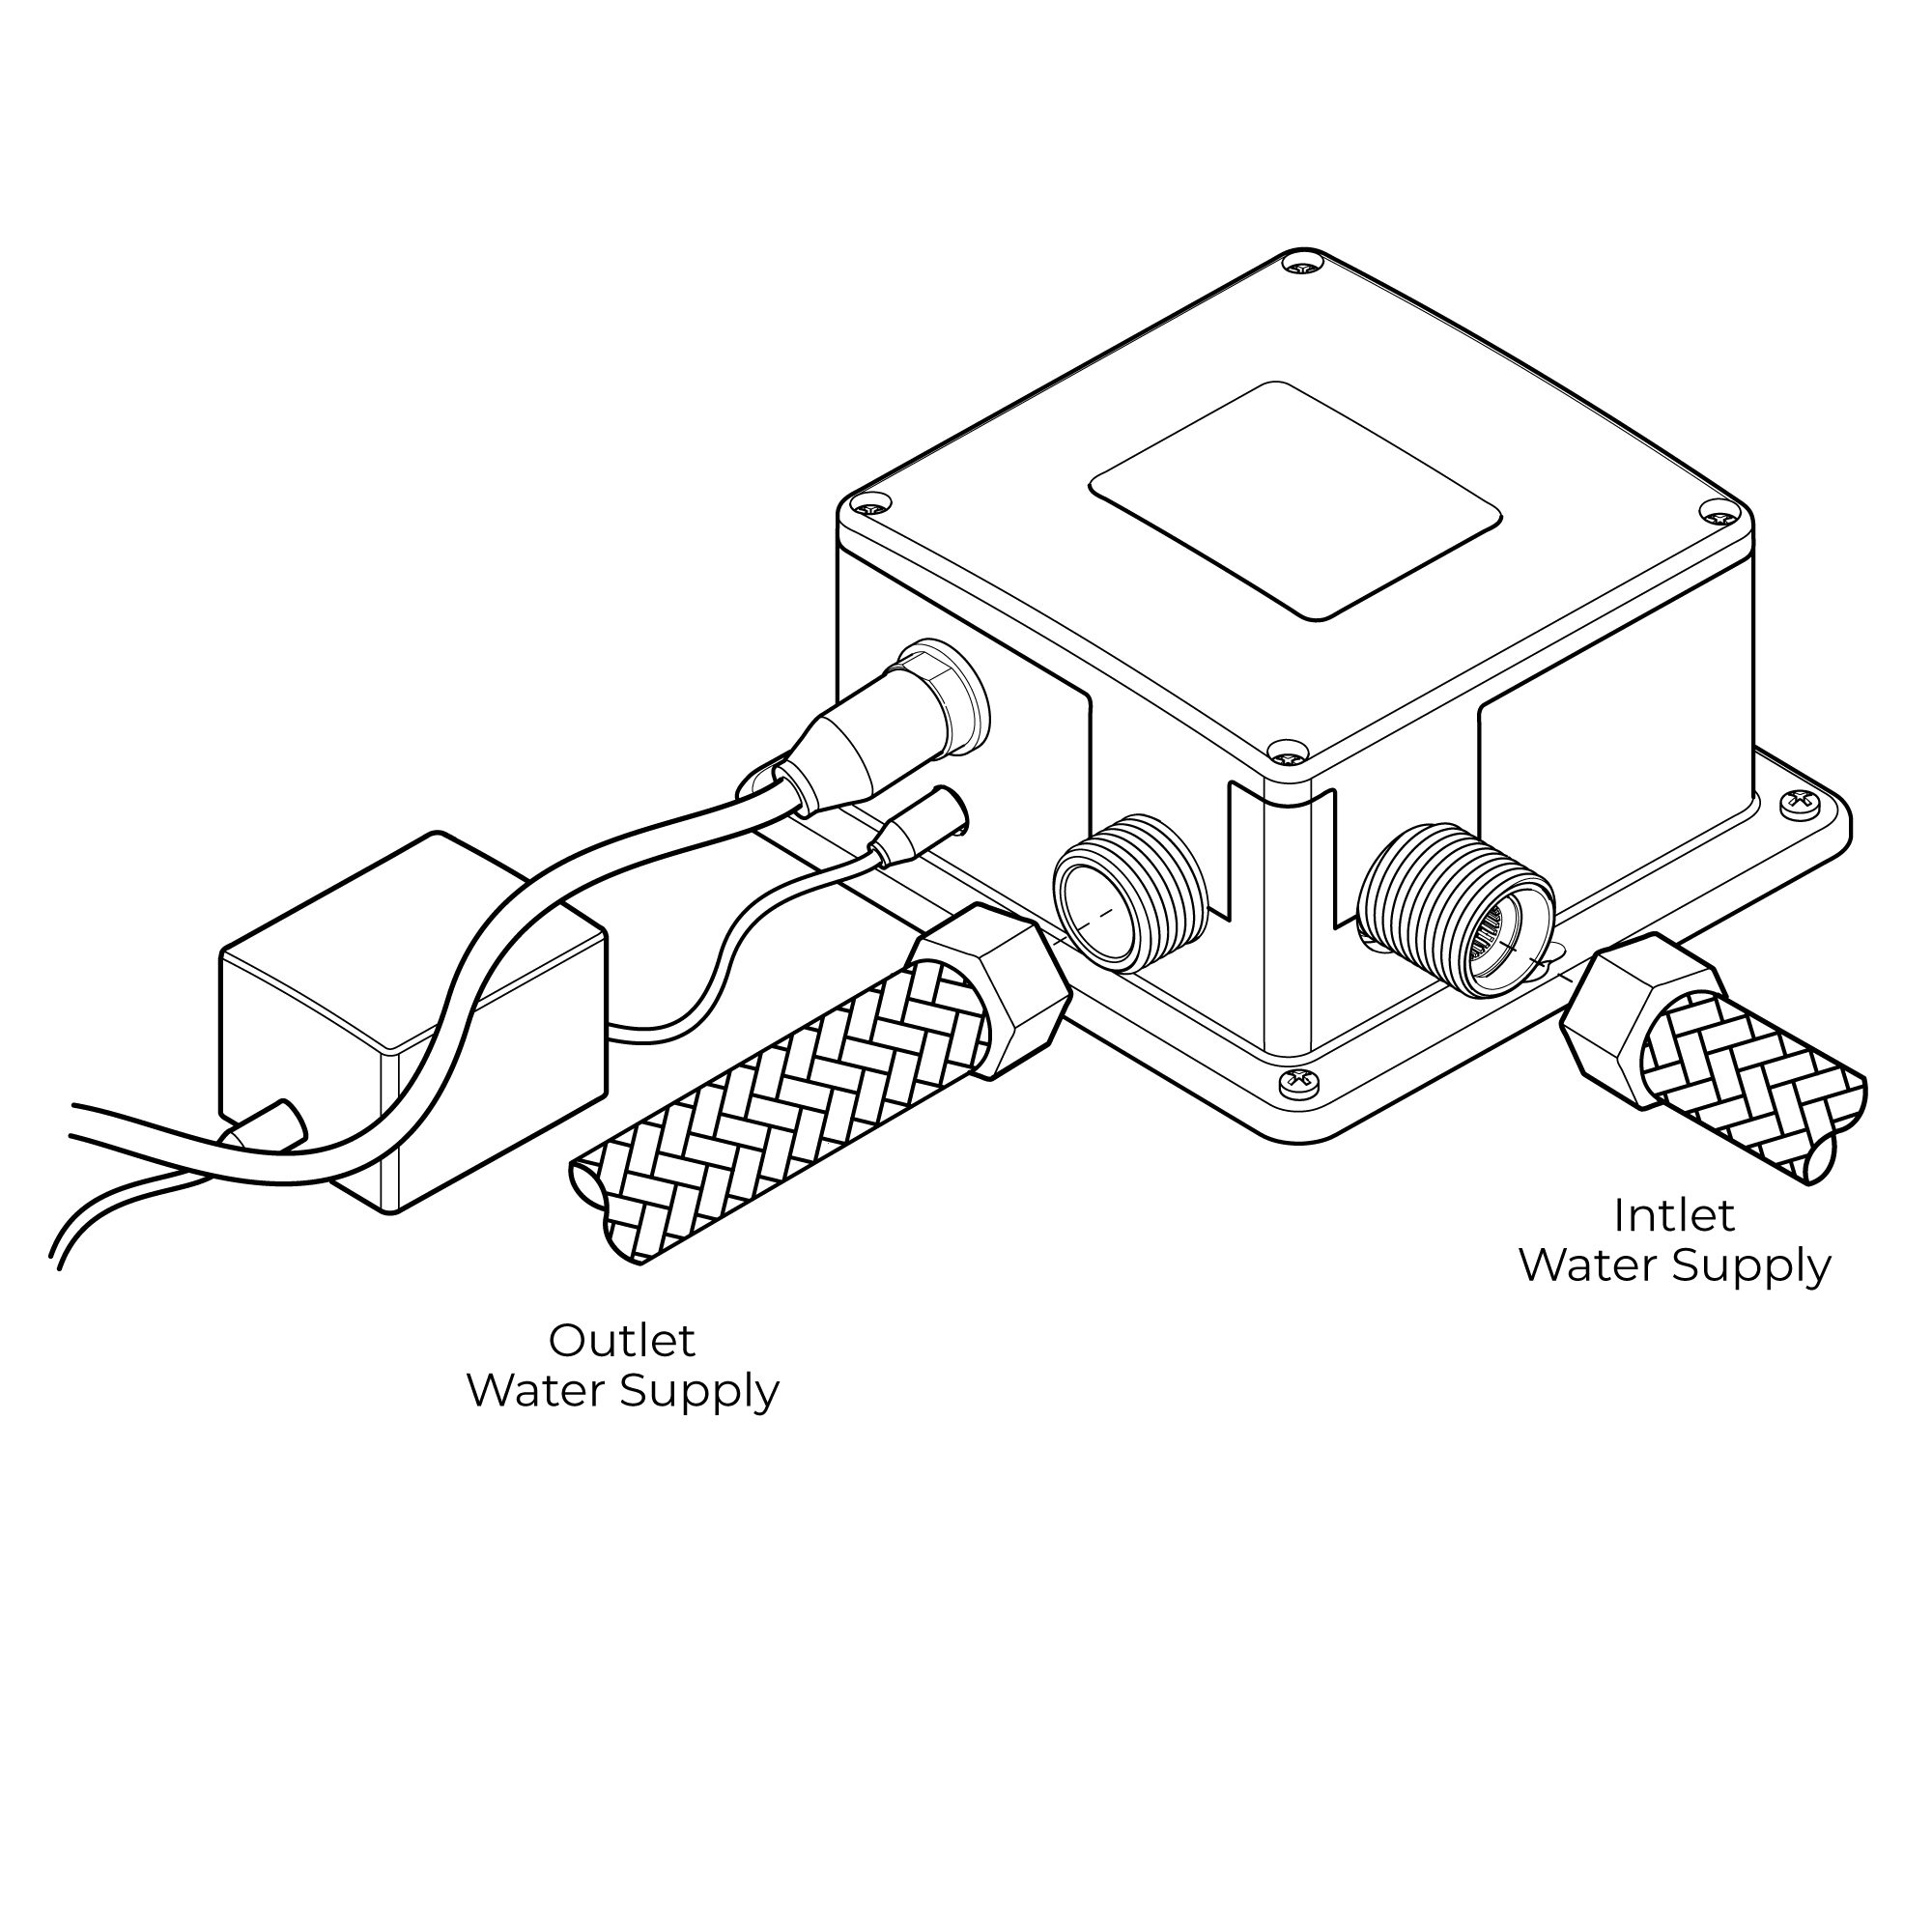
4. Connect the incoming water supply line to the control box, at the connection marked Inlet.
5. Thread on the swivel nut to the hose by hand. Tighten with a wrench.
6. Connect the faucet hose to the control box, at the connection marked Outlet.
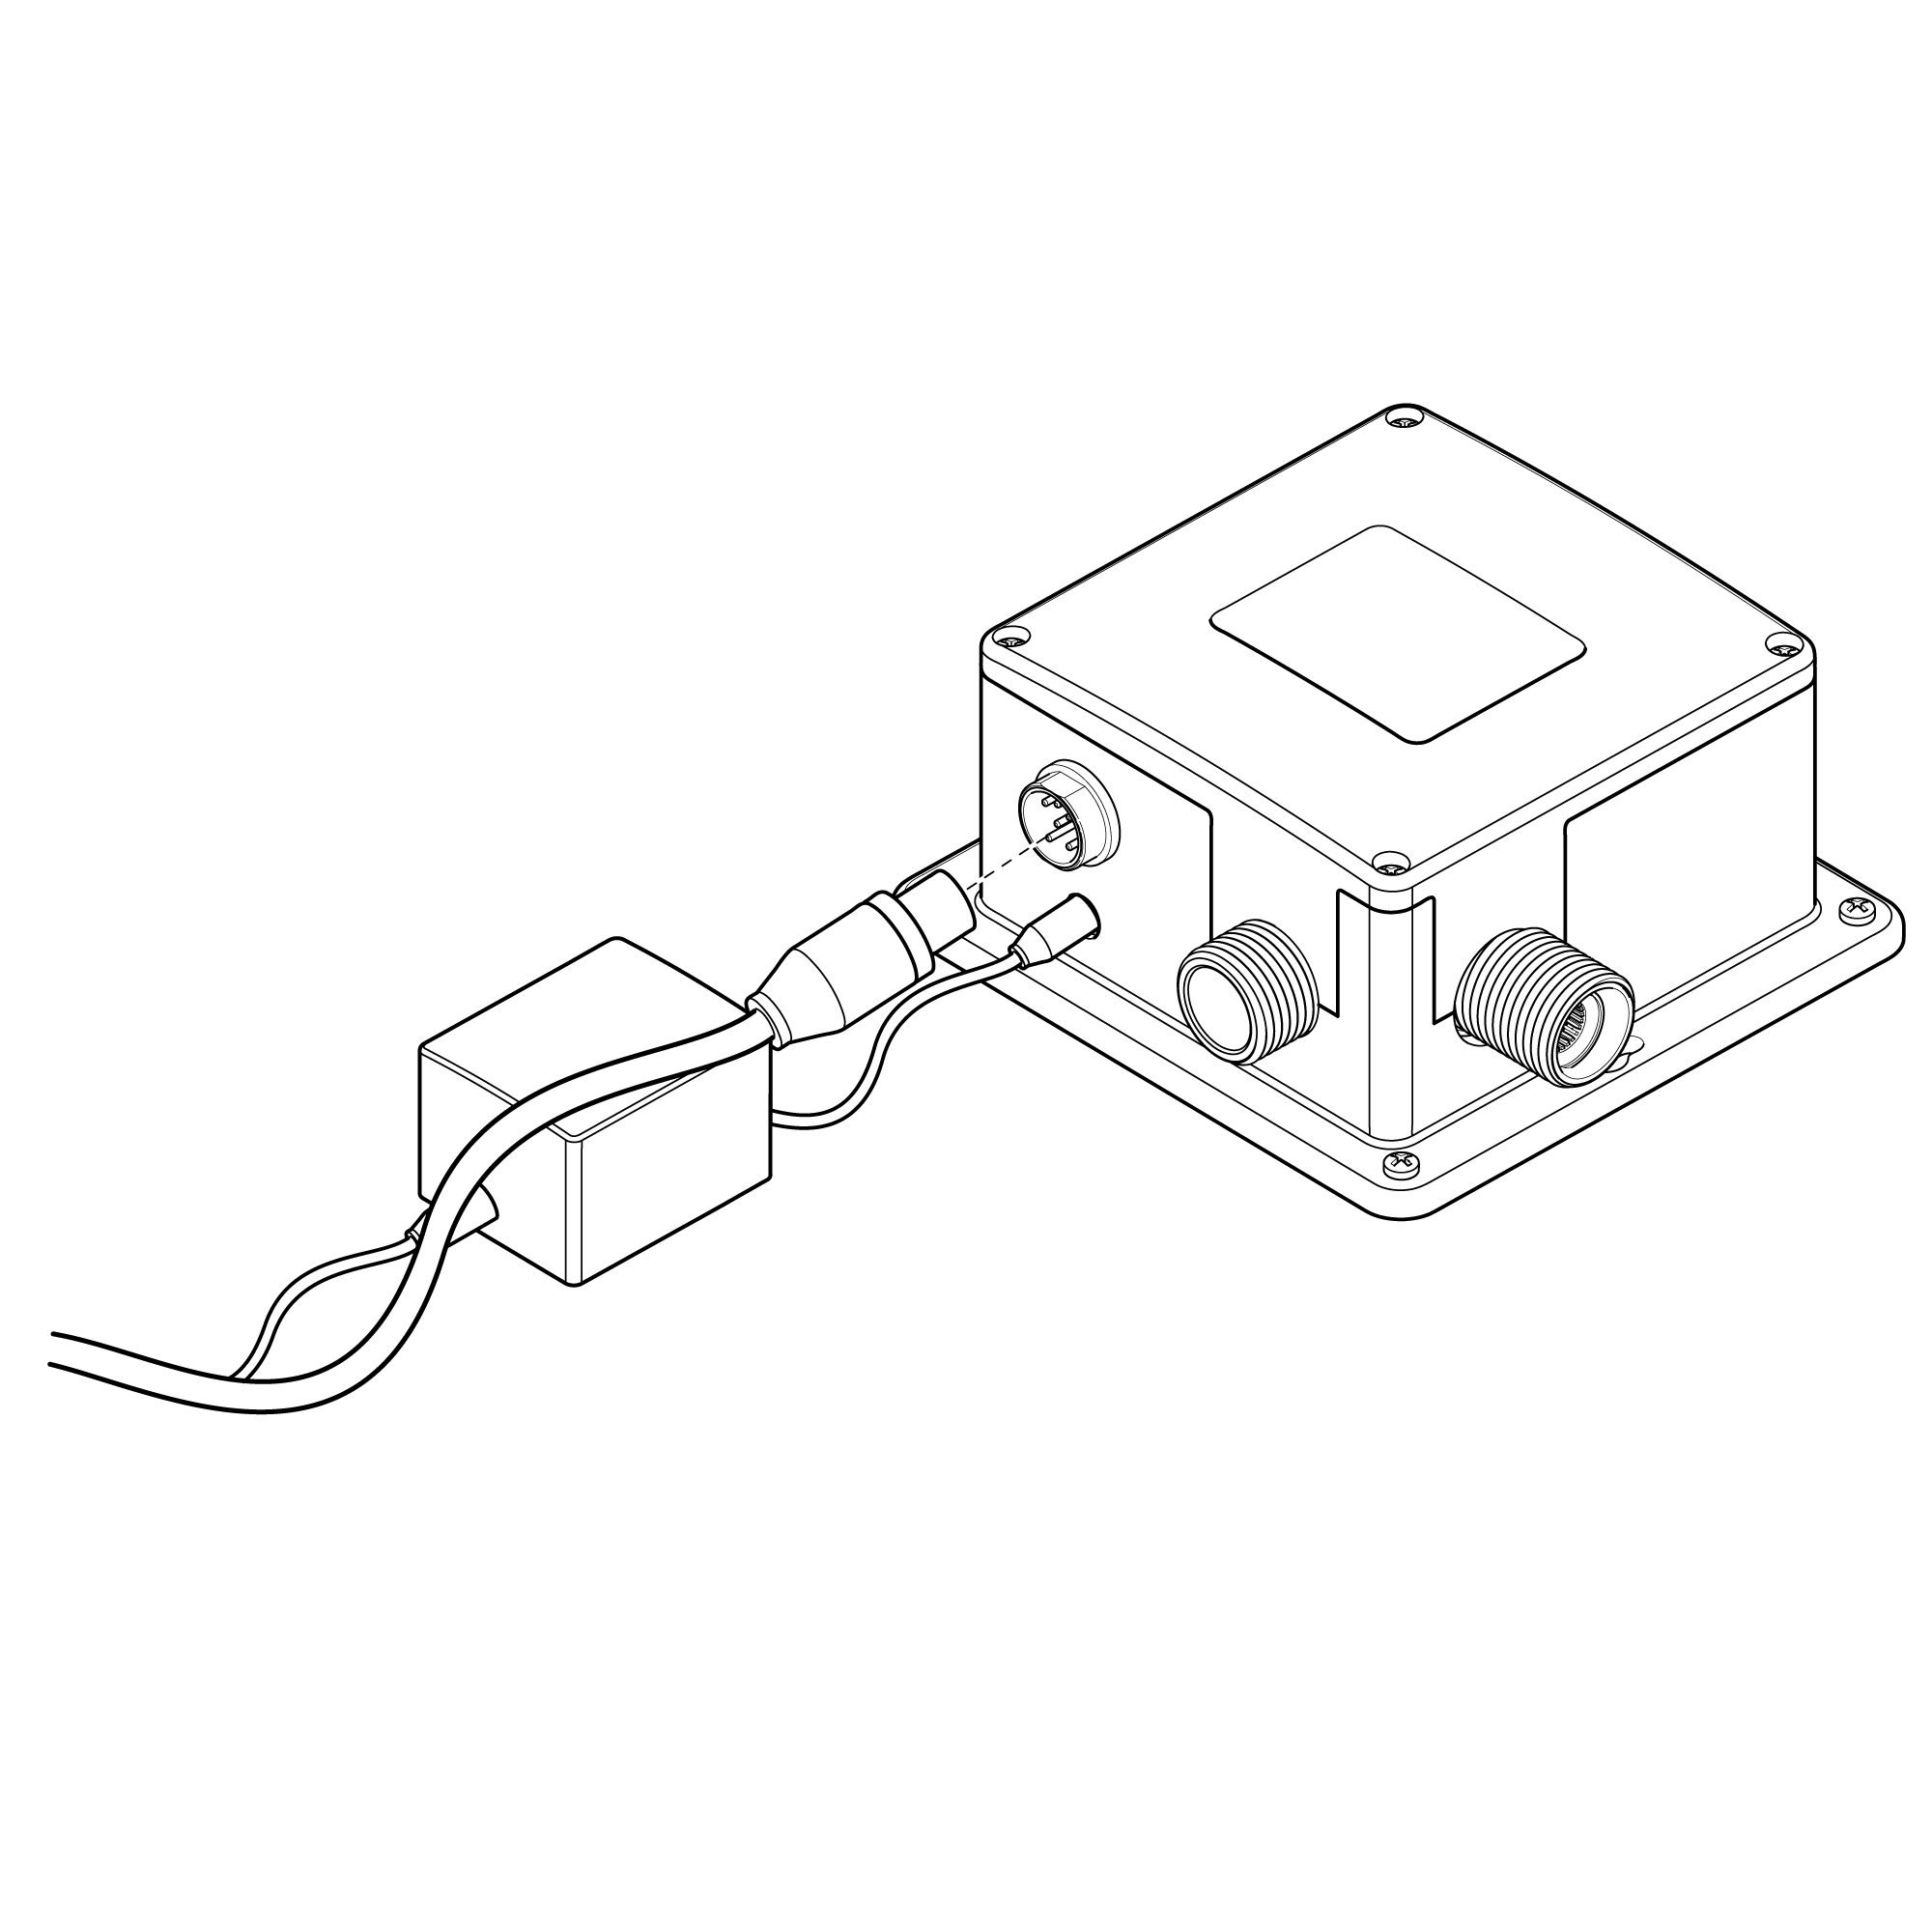
7. Slide sensor cable connector over the sensor cable connector on the control box and tighten by hand. Note: Prior to connecting the sensor cable to the control box, open the water supply stop valve and ensure the sink basin is completely clean and clear of objects, or the sensor will not correctly calibrate. Please wait approximately 60 seconds after connecting the sensor cable for sensor calibration to complete and to begin using the faucet.
Control Box Installation 1. Remove the four screws from the control box. Remove the control box cover. Remove the battery box from the control box, and gently remove the screw from the battery box cover. Install AA batteries in the orientation shown. Note: Use only alkaline AA batteries. Re-install the battery box cover, matching the alignment arrows together. Set the battery box back into the control box, and re-install the control box cover using the previously removed screws.
2. Choose a location under the sink basin to mount the control box, such that the sensor cable, flexible hose, and incoming water supply all connect to the control box. Under the sink basin, drill a hole minimum 3/4” to fit the sensor cable and flexible hose from the spout. Feed the sensor cable and flexible hose through the hole.
3. Mount the control box to the wall in the orientation shown. Drill four 1/8" (3mm) holes, and push drywall anchors into each hole. Secure the control box to the wall with the drywall screws.
4. Connect the incoming water supply line to the control box, at the connection marked Inlet.
5. Thread on the swivel nut to the hose by hand. Tighten with a wrench.
6. Connect the faucet hose to the control box, at the connection marked Outlet.
7. Slide sensor cable connector over the sensor cable connector on the control box and tighten by hand. Note: Prior to connecting the sensor cable to the control box, open the water supply stop valve and ensure the sink basin is completely clean and clear of objects, or the sensor will not correctly calibrate. Please wait approximately 60 seconds after connecting the sensor cable for sensor calibration to complete and to begin using the faucet.
Electrical Connections
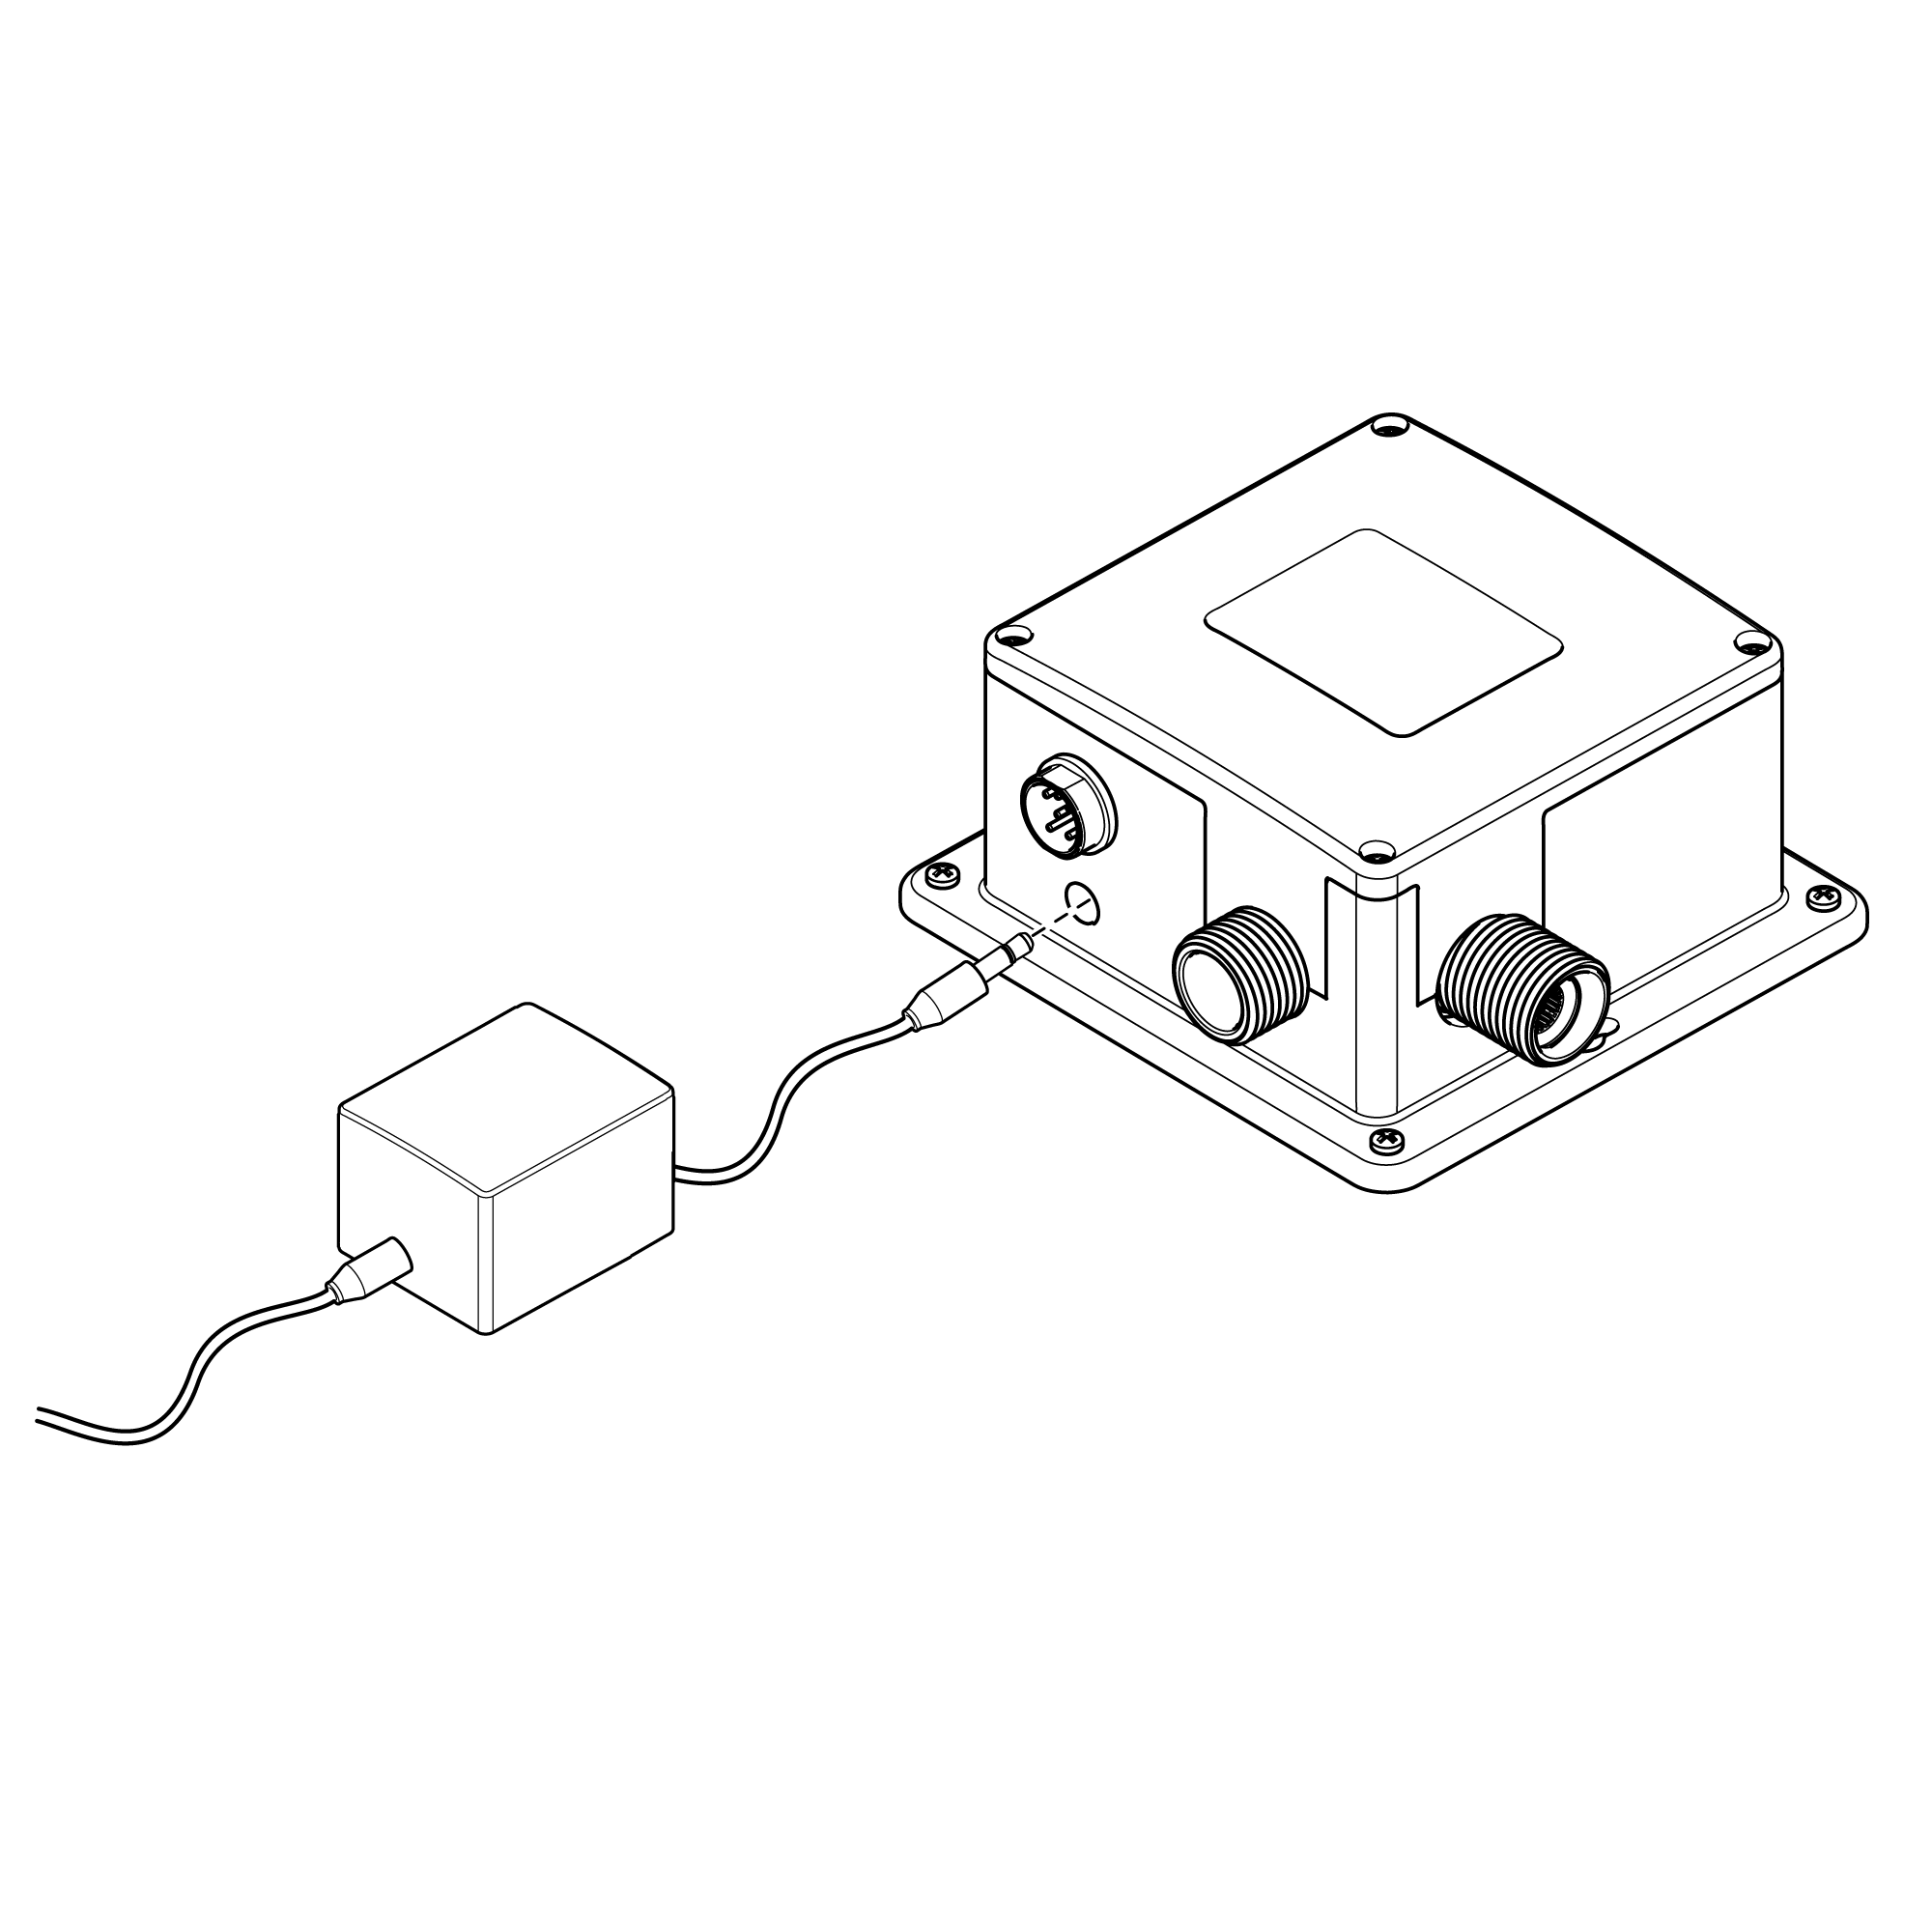
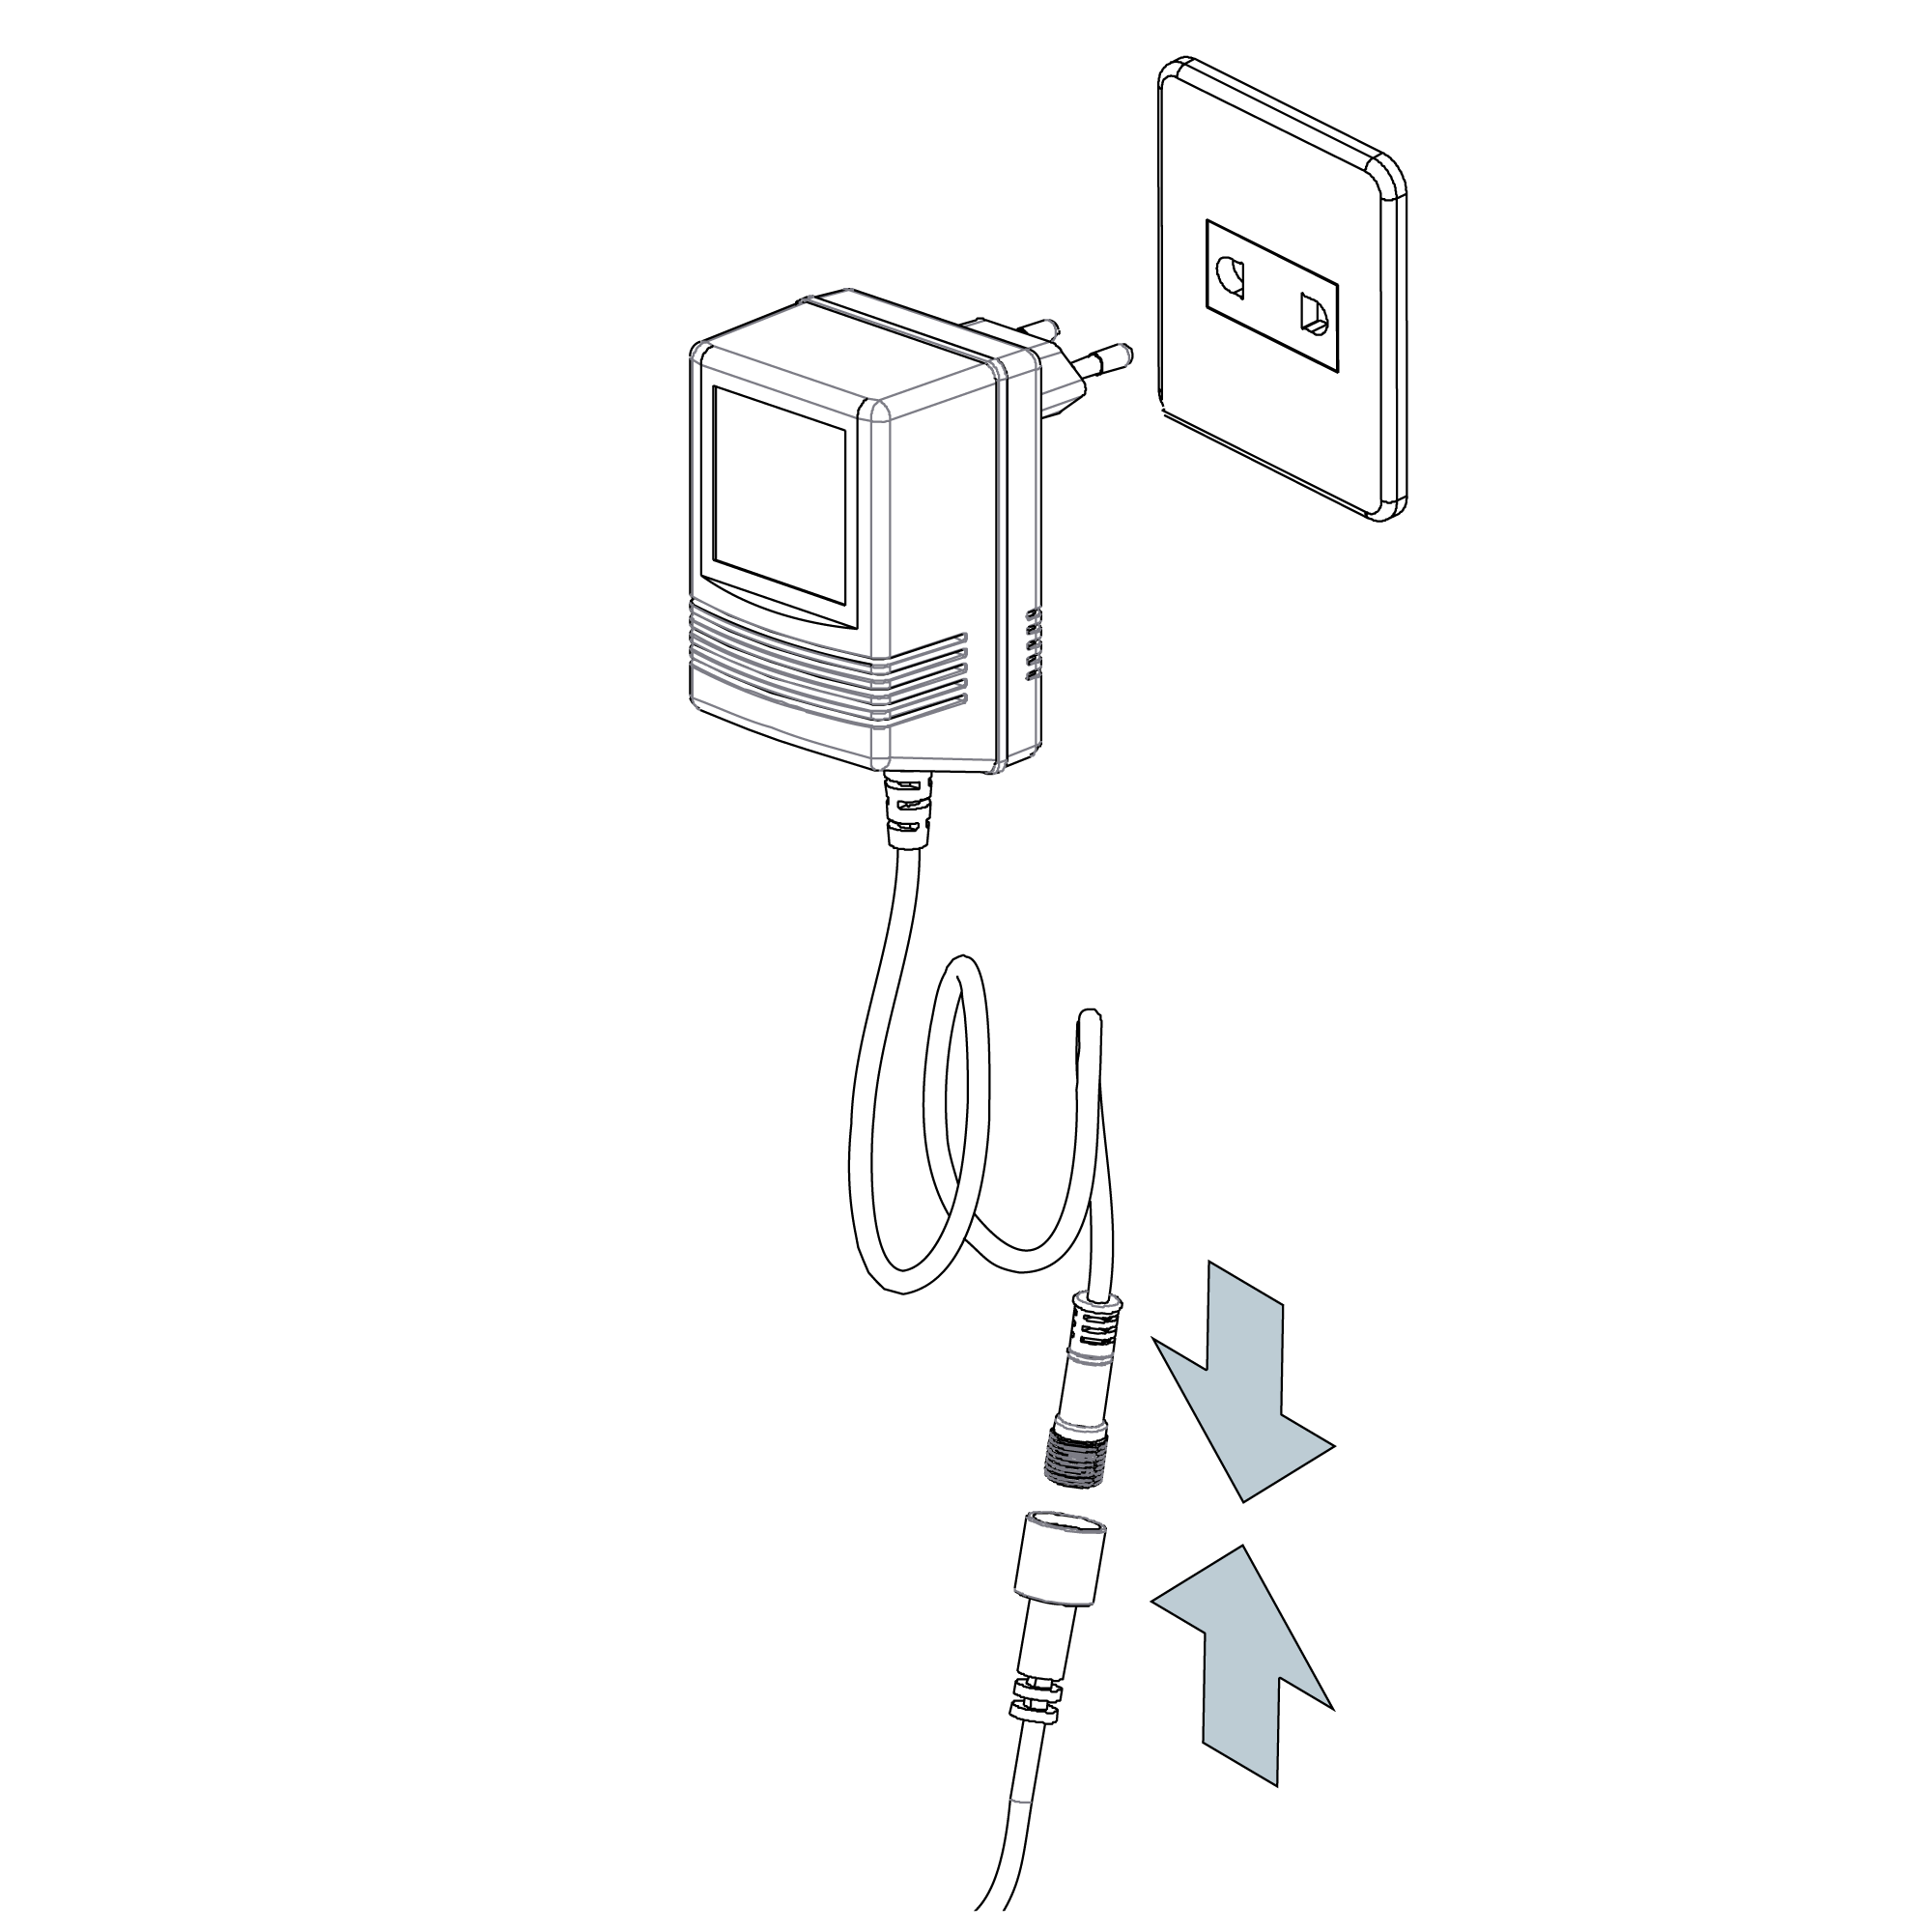
1. Position Power Supply Box - Position the power supply box onto the wall surface below the sink/work surface where it is easily accessible. Note: Ensure that the power supply box is fitted the correct way up and that the flexible hose will reach from the underside of the spout to the power supply box. Using suitable fixings for the wall type secure the power supply box to the wall.
2. Plug-In Power Cable - Plug the power cable into the power supply box.
3. Connect The Sensor Cable - Plug the sensor cable from the spout into the power supply box to activate the infrared senor.
Water Connections
Connecting Water Supply - A blended water supply is required to the inlet of the power supply box. Before connecting the water supply to the power supply box flush through the pipework to ensure removal of debris. Once flushed through turn off the mains water supply and close any isolating valves.
Inlet Connection - The inlet connection on the power supply box is a 1/2” BSP male threaded connection. Connect a 1/2” BSP female connector to the inlet connection ensuring a suitable sealing washer is used to create a watertight connection.
Outlet Connection - The outlet connection is a standard 1/2” BSP male threaded connection. Connect the flexi hose to the outlet connection, ensuring it is tightened fully.
Sensor Range
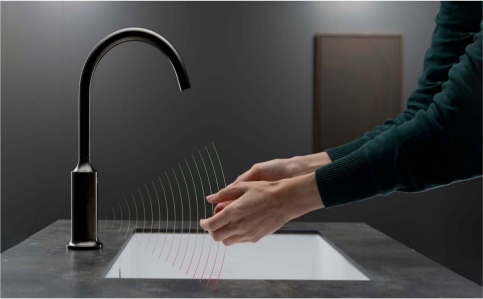
This machine can automatically adjust the inductive range within 10 seconds of electrification. Don't use inductor during this period in order for the inductor to automatically adjust to a suitable inductive range.
Set Water Flow Time-Out
The machine will shut off the water when washing time exceeds 1.5 minutes foreign matter induces continuously in inductive areal. If follow-up washing is needed, re-induce after removing hands for 2 seconds.
Notes 1. Please use the AA type alkaline battery (1.5v for each). 2. Fix the battery correctly. Should not be mix use the batteries with different brands, the new and old and if use non-alkaline battery, the battery life is short in 1-2 months. 3. After installation of the battery, the solenoid valve will do its self-testing. 4. After providing the power, in 10sec, the machine will self adjust the sensor distance, so during this period, do not make it work. 5. If the sensor distance is short, please move away the barrier for 5-6 mins, the machine will adjust to normal. 6. If the sensor distance from far to near, and water flows continuously, the machine will self-adjust the distance after 5 mins.





.jpg)